
Landscaping
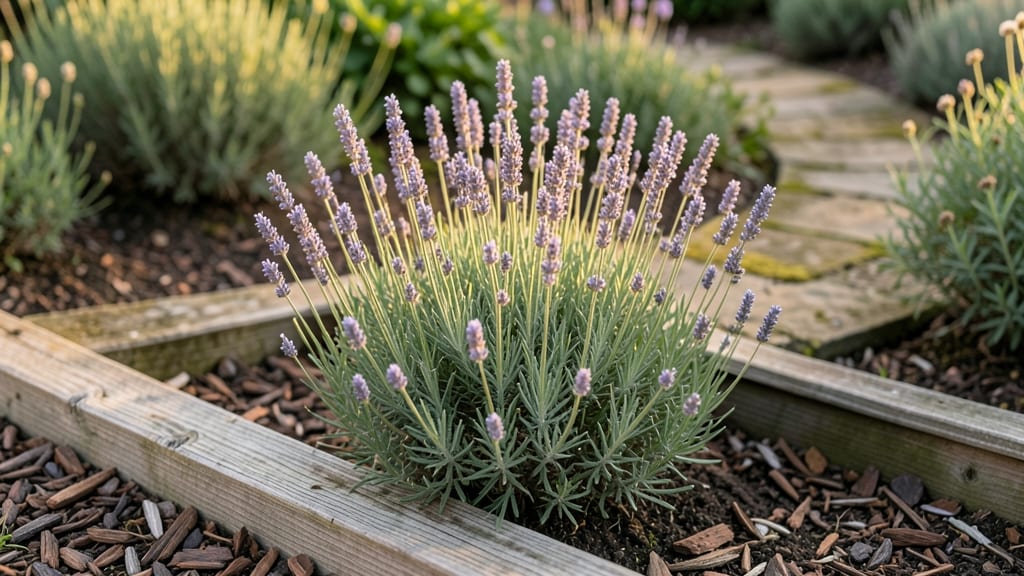
These landscape timber flower bed designs bring that warm, lived-in charm to your yard that store-bought plastic borders can’t touch—cedar, pine, and reclaimed barn wood, each with its own personality. They look great whether your garden’s bursting with summer blooms or resting under winter snow.
The key is matching the timber’s natural grain and weathered look with plants that play up its rustic texture, like lavender, ornamental grasses, and hardy perennials that spill over the edges.
You don’t need fancy tools or a degree in carpentry—just a circular saw, a level, and a few hours on a dry weekend. Cedar resists rot best for long-term beds, while pine offers that classic barnwood feel at a lower cost.
For height, stack timbers vertically to create natural dividers, or lay them horizontally as low borders to frame delicate annuals. The secret to year-round appeal? Layer evergreens like boxwood or juniper at the base so the bed never looks bare, even when summer flowers fade.
What you’ll end up with is a flower bed that feels intentional, not like an afterthought. The timbers soften harsh lines, while the plants add movement and color—think deep purple salvia contrasting with the warm tones of weathered wood.
In fall, add ornamental kale or dusty miller for texture, and by winter, the structure remains while dormant stems and seed heads add unexpected interest. It’s the kind of design that makes neighbors pause and ask, “What’s your secret?”
Works in any yard size, from a small front garden to a sprawling backyard. The same principles apply whether you’re framing a single rose bush or creating a multi-level display. Here’s how to make it happen without breaking the bank or your back.
📚 In This Guide
- What you need
- Instructions
- Tips and common mistakes
- Wrapping up and next steps
What you need
- ● Timber (main structure): Pressure-treated lumber (2x4s or 2x6s) – 8-12 pieces, cut to desired bed dimensions (e.g., 4 ft x 6 ft).
- ● Corner posts or stakes – 4-6 pieces, 4x4 lumber for stability.
- ● Galvanized screws or decking nails – 50-100 pieces, 2.5-3 inches long.
- ● Landscape fabric: 1 roll (to suppress weeds and retain moisture).
- ● Mulch: 2-3 cubic feet (cedar or pine mulch for a rustic look).
- ● Soil: Topsoil – 1 cubic yard (for filling the bed).
- ● Compost or potting mix – 1-2 bags (to enrich the soil).
- ● Plants: Choose a mix of perennials, annuals, and shrubs (e.g., lavender, black-eyed Susans, or ornamental grasses). Quantity depends on spacing needs (check plant tags!).
- ○ Optional decorative touches: Stain or paint (for timber—choose a weather-resistant finish).
- ● Landscape timbers or cap rails – 2-4 pieces (to frame the top).
- ● Solar-powered landscape lights – 4-6 units (for evening ambiance).
- ● Essentials: Circular saw or handsaw – for cutting lumber.
- ● Drill/driver – for assembling the frame.
- ● Measuring tape, level, and pencil – for precision.
- ● Shovel and garden rake – for soil prep.
- ● Work gloves and safety goggles – for protection.
- ○ Optional (but helpful): Post hole digger – if securing corner stakes deeply.
- ● Staple gun – for securing landscape fabric.
- ● String line – to mark bed layout before digging.
- ● Clear the area of grass, rocks, or debris (use a sod cutter if needed).
- ● Check local regulations for permits (especially if the bed is large or near property lines).
- ● Plan your design: Sketch the shape (rectangular, curved, or freeform?) and plant placement.
- ● Pro tip: 💡 Measure twice, cut once! Double-check lumber lengths before cutting to avoid waste.
Instructions for building a rustic timber flower bed
Here’s how to craft a durable, visually striking timber flower bed that frames your garden beautifully.
Measure and Mark Your Flower Bed Layout
Start by sketching your design on paper to visualize the shape—rectangles, circles, or freeform curves all work well. Use wooden stakes and a string line to mark the perimeter directly in your yard. For a 4-foot-wide bed (ideal for most flowers), measure 6 feet long for a balanced look. Adjust based on your space, but keep in mind taller plants like shrubs need at least 3 feet of width to thrive.
Step outside with your measuring tape and mark the corners with temporary stakes. Double-check your measurements before moving forward—once you dig, you won’t want to adjust. I like to walk around the marked area to ensure it fits naturally with your yard’s flow and doesn’t block walkways or windows.
Prepare the Soil and Dig the Bed
Remove grass, weeds, and debris from within your marked area using a shovel or edging tool. Dig down 6-8 inches to loosen the soil, breaking up any compacted layers with a garden fork. This depth ensures roots have room to spread without competition from surrounding grass.
Once the soil is loose, rake it smooth and level. If your soil is heavy clay or sandy, mix in 2-3 inches of compost to improve drainage and fertility. This step is critical—skipping it leads to poor plant growth and requires more maintenance later. For a 4-foot-wide bed, you’ll need about 1 cubic yard of amended soil to refresh the area properly.
Install the Timber Edging
Cut your timber pieces to fit the marked perimeter, using a circular saw or handsaw. For a classic look, opt for 6-inch-wide timbers and arrange them vertically, 8-10 inches deep into the ground. Space the corners at 45-degree angles for a sturdy, polished finish. Use a level to ensure each piece sits perfectly upright before backfilling with soil.
Secure the corners with galvanized screws (not nails—they rust over time) and reinforce long sections with L-brackets every 2 feet. This prevents shifting as plants grow and soil settles. If you’re using untreated timber, seal the edges with outdoor wood stain to extend its life and resist moisture damage.
Add Mulch and Plant Your Flowers
Fill the bed with your amended soil, then top with 2-3 inches of mulch (like shredded bark or pine straw) to suppress weeds and retain moisture. Leave a 1-inch gap between the mulch and the timber to prevent rot. Now’s the time to plant perennials, annuals, or shrubs—space them according to their mature size, typically 12-24 inches apart for most flowers.
For year-round interest, layer plants with varying heights: tall backrow (like coneflowers), mid-height (like black-eyed Susans), and low ground cover (like creeping thyme). Water deeply after planting to settle the soil and encourage root growth. Avoid stepping inside the bed to protect young plants.
Maintain and Refresh Seasonally
Check the timber edging annually for signs of rot or loose screws, tightening or replacing pieces as needed. In early spring, refresh the mulch layer to 2-3 inches and top-dress with 1-2 inches of compost to feed the soil. Prune back dead foliage from perennials in late winter to encourage new growth.
For a low-maintenance look, group plants with similar water needs together. Drip irrigation along the bed’s edge keeps moisture consistent without overwatering. This design holds up beautifully for years—just a little seasonal care keeps it looking rustic and intentional.
Tips & tricks for perfect rustic timber flower bed designs
A few key strategies will help you create a sturdy, beautiful flower bed that stands the test of time and seasons.
Design Tip: When sketching your layout in Step 1, consider adding a slight inward curve to the corners of your timber edging. This subtle design detail prevents soil erosion and gives your flower bed a more natural, organic look. It also makes planting easier since the corners won't be as sharp when you're arranging flowers. I've found that a gentle 2-3 inch curve at each corner makes a big difference in the finished appearance.
Soil Preparation Strategy: In Step 2, don't rush the soil preparation. After digging down 6-8 inches, take an extra 10 minutes to break up any large clumps with your hands. This creates a finer texture that roots can penetrate more easily. For clay-heavy soils, work in an extra inch of compost—this improves drainage significantly while adding nutrients. I've seen beds with poor drainage struggle even with beautiful plants, so this step is worth the extra effort.
Timber Installation Technique: When installing your 6-inch-wide timbers in Step 3, use a rubber mallet to tap them gently into place rather than forcing them with a hammer. This prevents splitting, especially at the corners where you've cut the 45-degree angles. Also, pre-drill screw holes for the galvanized screws to prevent wood splitting. I learned this the hard way—splitting timbers can ruin the whole look and require costly replacements.
Planting Layering Advice: In Step 4, when arranging your plants, start with the tallest varieties at the back and work forward to shorter plants. This creates a natural progression that draws the eye through your garden. For a 4-foot-wide bed, I recommend planting taller perennials like coneflowers along the back edge, mid-height plants like black-eyed Susans in the middle, and low-growing ground covers like creeping thyme at the front. This creates visual interest while keeping maintenance manageable.
Pro Tips for Landscape Timber Flower Bed Designs
- A few key strategies will help you create a sturdy, beautiful flower bed that stands the test of time and seasons.
- Design Tip: When sketching your layout in Step 1, consider adding a slight inward curve to the corners of your timber edging.
- Soil Preparation Strategy: In Step 2, don't rush the soil preparation.
Frequently asked questions
Got questions about creating stunning landscape timber flower bed designs? You’re not alone! Here are some of the most common queries—and their practical solutions—to help you get started with confidence.
What type of timber is best for outdoor flower beds?
For durability and weather resistance, opt for cedar, redwood, or pressure-treated pine. Cedar and redwood naturally resist rot and insects, while pressure-treated pine is budget-friendly but may require sealing. Avoid untreated wood—it won’t last long in moisture-heavy conditions. Pro tip: If using pressure-treated wood, wait 30 days before planting to let chemicals dissipate!
When is the best time to install a timber flower bed?
The ideal time is early spring or fall when temperatures are mild. This gives plants time to establish roots before extreme heat or cold. Avoid winter installation (unless in frost-free zones) or peak summer, as young plants may struggle. Bonus: Spring also lets you enjoy blooms sooner!
Can I build a timber flower bed on a budget?
Skip pre-cut timber and source reclaimed wood (check local salvage yards or construction sites). Use shorter boards for height variation or stack stones/cobblestones as edging. DIY with basic tools like a saw, drill, and level—no need for expensive landscaping services. Savings hack: Split costs with neighbors for bulk materials!
How do I prevent pests or rot in timber flower beds?
Start with treated or naturally rot-resistant wood, and elevate beds slightly (4–6 inches) to improve drainage. Apply a wood sealant annually (spring or fall) to extend lifespan. Avoid planting invasive species like mint near timber, as their roots can accelerate decay. Quick fix: Copper nails in wood corners deter termites!
What flowers thrive in timber-edged beds?
Choose low-maintenance, drought-tolerant plants like lavender, salvia, or ornamental grasses for long-term success. For color, try perennials (e.g., coneflowers, black-eyed Susans) or annuals (e.g., petunias, marigolds) for seasonal pops. Group plants by sunlight needs (full sun, partial shade) to avoid overcrowding. Design tip: Tall flowers at the back, short ones in front!
What if my timber starts warping or leaning?
Warping is normal for untreated wood—replace damaged sections promptly. To prevent leaning, pre-drill screws and use galvanized hardware for stability. For minor fixes, prop up wobbly sections with landscape stakes until you can replace them. Prevention: Bury the bottom 2 inches of timber below soil to deter moisture damage!
Wrapping up and next steps
Transforming your outdoor space with landscape timber flower bed designs isn’t just about aesthetics—it’s about creating a functional, low-maintenance oasis that thrives year-round. Whether you’re drawn to rustic charm, modern minimalism, or lush vertical gardens, timber beds offer durability, versatility, and a natural touch that elevates any yard. 🌿
The key? Start small, gather inspiration, and let your creativity bloom! Ready to dive in? Sketch a rough design, gather your materials, and begin building—your future garden’s waiting for you. Need a little extra guidance? Check out our step-by-step project guide to turn your vision into reality.