
Flowers
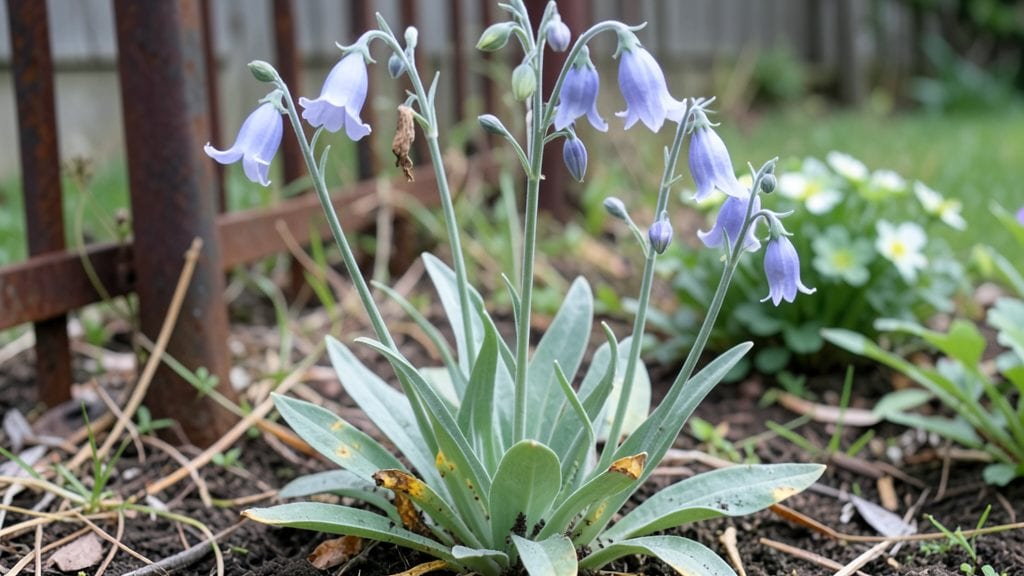
Growing bellflower perennials in full sun transforms any garden into a magnet for bees and butterflies. 🌿 I’ve watched my own Campanula persicifolia turn a shady corner into a buzzing, fragrant display—all while requiring almost no fuss.
The key lies in matching their love of sunlight with the right soil and spacing, which keeps them blooming from early summer straight through fall.
Start with well-draining soil and a spot that gets at least 6 hours of sun daily—these plants thrive where others might wilt. Space them 12-18 inches apart to prevent overcrowding, and mulch lightly to retain moisture without smothering their delicate roots.
Varieties like Campanula takesimana (the peach bellflower) add a pop of color, while the classic Campanula persicifolia brings that signature bell shape to borders and cottage-style gardens.
By midseason, you’ll be rewarded with clusters of vibrant blue, purple, or pink blooms that pollinators can’t resist. Deadhead spent flowers to encourage more blooms, and avoid heavy feeding—bellflowers prefer lean soil. The best part? They’re drought-tolerant once established, making them a low-maintenance star for any sunny plot.
Whether you’re lining a path or filling a wildflower meadow, bellflowers deliver effortless beauty with minimal effort. Here’s how to keep them thriving—and troubleshooting when they don’t.
📚 In This Guide
- What you need
- Instructions
- Tips and common mistakes
- Wrapping up and next steps
What you need
- ● Bell Flower Plants: 3–5 Campanula persicifolia (Peach-leaved Bellflower) or Campanula medium (Canterbury Bell) plants (for full bloom impact).
- ○ Seedlings (optional): 10–20 seeds if starting from scratch (germination takes 14–21 days).
- ● Soil: 5–10 lbs of well-draining potting mix (or garden soil amended with 1 part perlite to 3 parts compost).
- ● pH level: 6.0–7.0 (slightly acidic to neutral).
- ● Fertilizer: 1 cup balanced, slow-release fertilizer (10-10-10 or 5-10-5 ratio).
- ● Organic option: 2 tbsp bone meal or worm castings at planting time.
- ● Gardening Tools: 1 trowel (for transplanting).
- ● 1 pair pruning shears (for deadheading or shaping).
- ● 1 watering can or hose with a gentle spray nozzle.
- ○ Optional (but helpful!): Mulch (2–3 inches of shredded bark or straw to retain moisture).
- ● Plant markers (to label varieties if mixing types).
- ● Garden gloves (for comfort while handling soil or thorns on some varieties).
- ● Sunlight: A full-sun to partial-shade spot (6+ hours of direct sun daily for best blooms).
- ● Hardiness Zone: USDA Zones 3–9 (check your zone here).
- ● Spacing: 12–18 inches apart (for clumping varieties like Campanula glomerata).
- ● Watering: Keep soil consistently moist (not soggy) for the first 2 weeks post-planting.
Step-by-Step guide to planting bell flower perennials for year-round pollinator appeal
Here's how to create a thriving bell flower perennial display that blooms reliably from early summer through frost.
🌱 Step 1: Select the Perfect Planting Location
Bell flowers (Campanula spp.) thrive in full sun to partial shade, with at least 6 hours of direct sunlight daily for optimal blooming. I always choose a spot with well-draining soil—these plants despise soggy roots. Test your soil by digging a 6-inch hole; if water pools after 30 minutes, amend with 2-3 inches of compost to improve drainage.
For maximum pollinator impact, plant in groups of 3-5 plants spaced 12-18 inches apart. This creates a dense, continuous bloom display that butterflies and bees adore. If your site has afternoon shade, opt for varieties like Campanula persicifolia (peach-leaf bellflower), which tolerates lighter conditions better than sun-lovers.
🪴 Step 2: Prepare the Soil and Plant Bare-Root Specimens
Loosen the soil in your planting area to a depth of 12 inches, breaking up any compacted layers with a garden fork. Mix in 2-3 cups of 5-10-10 fertilizer per planting hole to provide slow-release nutrients. Bell flowers prefer slightly alkaline soil (pH 6.5-7.5), so test your soil and adjust with pelletized lime if needed.
Soak bare-root plants in lukewarm water for 15-20 minutes before planting to rehydrate the roots. Dig holes twice as wide as the root ball but no deeper—planting too deeply suffocates the crown. Position each plant so the top of the root ball sits just below soil level to prevent rot. Backfill with native soil, firming gently to eliminate air pockets.
☀️ Step 3: Water Thoroughly and Mulch for Retention
Water each newly planted bell flower with 1 gallon of water immediately after planting to settle the soil. For the first 2-3 weeks, keep the soil consistently moist—1 inch of water per week—until new growth appears. You'll notice first true leaves emerging within 3-4 weeks if moisture and temperature are ideal (55-75°F).
Apply a 2-inch layer of organic mulch (like shredded bark) around each plant, keeping it 3 inches away from stems to prevent rot. Mulch conserves moisture, regulates soil temperature, and suppresses weeds—critical for bell flowers, which have delicate foliage. Replenish mulch annually in early spring to maintain protection.
✂️ Step 4: Prune for Continuous Blooms and Winter Hardiness
Deadhead spent blooms by pinching off flower stems at the base as soon as they fade. This encourages reblooming throughout the season and prevents seed formation, which diverts energy from new growth. I prune mine every 2-3 weeks during peak bloom (June-August) to maintain a tidy, productive plant.
In late fall, cut back one-third of the foliage to reduce winter dieback. This pruning stimulates fresh growth in spring. For varieties like Campanula medium (giant bellflower), which can flop in heavy rain, stake tall stems with 4-inch bamboo stakes tied loosely with twine to support their upright habit.
🌿 Step 5: Fertilize and Monitor for Pests
Feed established bell flowers in early spring with ½ cup of 10-10-10 fertilizer per plant, worked into the soil. Avoid high-nitrogen fertilizers—they promote leafy growth at the expense of blooms. Water deeply after fertilizing to prevent root burn. Repeat in mid-summer with a low-phosphorus formula (5-10-10) to support fall blooming.
Watch for aphids on new shoots or slugs in damp conditions. I spray aphids off with a hose in the morning and set out beer traps (a shallow dish of beer) for slugs. Bell flowers are generally pest-resistant, but stressed plants attract issues—so maintain consistent watering and mulch to keep them thriving.
Tips & tricks for perfect bell flower perennial planting
These game-changing strategies will help you create a pollinator paradise that blooms reliably all season long.
Soil Preparation Secret: Before amending your soil with compost, I recommend running a simple pH test kit to confirm your soil's alkalinity. Bell flowers prefer a pH between 6.5-7.5, and adjusting with pelletized lime (if needed) during Step 2 makes all the difference. I've found that even slightly acidic soil can stunt growth—don't skip this test if your area tends toward acidic conditions. The 12-inch soil loosening you do in Step 2 gives roots room to establish properly, but compacted layers can still cause drainage issues if not fully broken up.
Watering Wisdom: Those first 2-3 weeks after planting are critical for root establishment. I've learned the hard way that inconsistent watering leads to stunted growth—set up a simple drip irrigation system or use soaker hoses to deliver that consistent 1 inch of water per week. The 3-4 week window for new growth emergence (at 55-75°F) gives you a clear target: if you're not seeing leaves by week 4, check your watering routine or soil moisture.
Pruning Precision: When deadheading in Step 4, I recommend using clean, sharp pruners and making cuts just above the next set of leaves. This encourages bushier growth and more blooms. For the late fall pruning, I cut back to about 2 inches above the soil line—this stimulates fresh spring growth without exposing the crown to harsh winter elements. The 2-3 week pruning schedule during peak bloom keeps your plants looking their best while maximizing flower production.
Fertilizer Timing: The early spring and mid-summer feeding schedule in Step 5 is perfect, but I've found that applying fertilizer right after the first true leaves emerge (around week 4) gives plants an extra boost. Always water deeply after fertilizing to prevent root burn, and avoid high-nitrogen formulas—they'll give you lush foliage but fewer blooms. The ½ cup measurement per plant is ideal for established plants, but newly planted specimens should wait until their second spring before fertilizing.
Pro Tips for Bell Flower Perennial
- These game-changing strategies will help you create a pollinator paradise that blooms reliably all season long.
- Soil Preparation Secret: Before amending your soil with compost, I recommend running a simple pH test kit to confirm your soil's alkalinity.
- Watering Wisdom: Those first 2-3 weeks after planting are critical for root establishment.
Frequently asked questions
Got questions about growing and caring for bell flower perennials? You’re in the right place! Here are answers to the most common inquiries—from planting tips to troubleshooting—so you can keep your garden blooming beautifully.
When is the best time to plant bell flower perennials?
Plant bell flowers in early spring or early fall for optimal root establishment. Avoid extreme heat or frost, as young plants are sensitive. If transplanting, water thoroughly after planting and mulch to retain moisture. For annual varieties, sow seeds directly in the garden after the last frost date.
How long does it take for bell flowers to bloom?
With proper care, bell flowers typically bloom 60–90 days after planting from seeds. Established perennials may bloom earlier, often starting in late spring and continuing through summer or fall, depending on the variety. Deadhead spent blooms to encourage more flowers!
Are bell flowers deer- or rabbit-resistant?
While bell flowers are not completely deer- or rabbit-proof, they’re less palatable than many other perennials. To deter pests, try repellent sprays, fencing, or companion planting with strongly scented herbs like lavender or rosemary. Monitor young plants closely, as they’re most vulnerable.
Can bell flowers grow in containers?
Yes! Bell flowers thrive in containers with well-draining soil and at least 6–8 inches of depth. Choose a pot with drainage holes and place it in full sun**. Water regularly, as container plants dry out faster. Dwarf varieties like Campanula portenschlagiana are ideal for small spaces.
Why aren’t my bell flowers blooming?
Lack of blooms often stems from over-fertilizing with high-nitrogen food, shady conditions, or crowded roots. Ensure your plant gets 6+ hours of sunlight daily and prune back leggy growth. Feed lightly with a low-nitrogen, high-phosphorus fertilizer in early spring to promote flowering.
Do bell flowers need winter protection?
Most bell flower perennials are hardy to USDA zones 3–9, but young plants or tender varieties may need mulch or frost cloth in harsh winters. Cut back dead foliage in early spring to make way for new growth. In zone 10+, provide afternoon shade to prevent heat stress.
Wrapping up and next steps
Adding a bell flower perennial to your garden is a rewarding choice—it’s low-maintenance, pollinator-friendly, and bursts with vibrant blooms from early summer to frost! Whether you’re a seasoned gardener or just starting, these sun-loving beauties bring effortless charm and ecological benefits. 🌸
Ready to transform your outdoor space? Start by selecting the right variety for your climate, then plant with confidence—your garden (and local pollinators) will thank you! Grab your gloves and dig in—happy gardening!