
Flowers
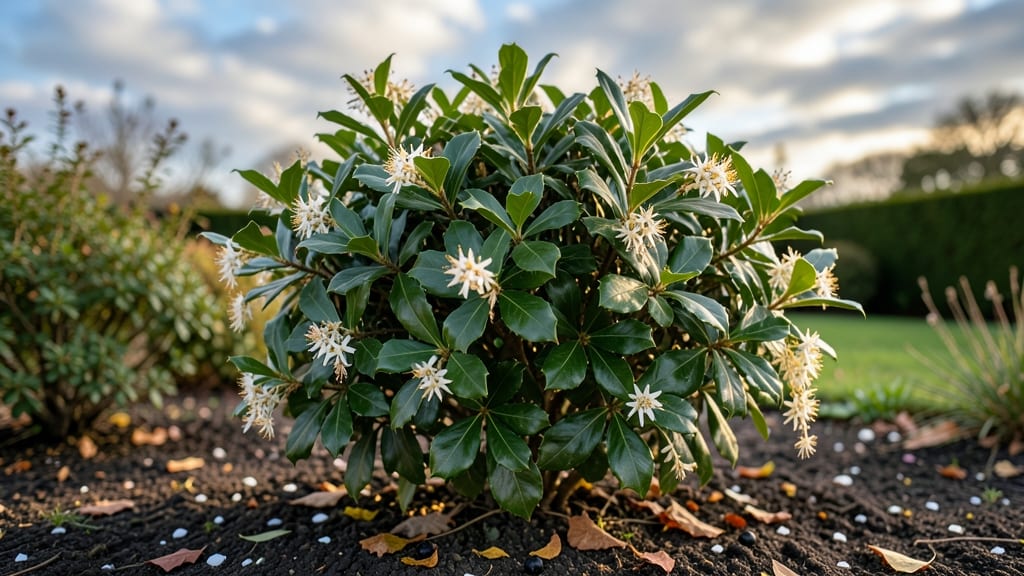
Growing inkberry holly flowers brings quiet beauty to shady corners with fragrant white blooms that hummingbirds adore. 🌿 I planted mine three years ago after struggling with flashy but high-maintenance shrubs, and now it’s the backbone of my low-light garden.
The real magic happens in late spring when tiny white flowers appear—discreet but reliable, never demanding attention.
This evergreen thrives where others fail: partial shade, moist soil, and even wet feet. Most people overlook it for showier plants, but inkberry delivers year-round interest with glossy leaves, winter berries, and that delicate floral scent.
You’ll need well-draining soil (amend with compost if yours is heavy) and patience—it grows slowly but steadily, reaching 6-10 feet tall with time.
By summer’s end, you’ll have clusters of small white flowers followed by glossy black berries that persist through winter. The berries aren’t edible, but they add striking contrast against the dark green foliage.
Prune lightly after flowering to maintain shape, and watch for scale insects—the only real pest threat to these tough plants.
Perfect for foundation plantings, privacy screens, or woodland gardens where other shrubs struggle. Here’s how to grow it without the fuss—because sometimes the most elegant plants are the quietest ones.
📚 In This Guide
- What you need
- Instructions
- Tips and common mistakes
- Wrapping up and next steps
What you need
- ● Inkberry Holly Seeds or Cuttings: 5–10 seeds (or 2–3 healthy cuttings, 4–6 inches long) from a trusted nursery.
- ● Well-Draining Soil: A mix of 50% peat moss or coconut coir, 30% perlite or sand, and 20% compost (pH 5.0–6.5).
- ○ Growing Containers (Optional): 4–6 inch pots for seedlings (with drainage holes).
- ● 1–2 gallon pots for mature plants (or a garden bed if planting outdoors).
- ● Organic Mulch: Pine bark or shredded leaves (2–3 inches thick) to retain moisture.
- ● Pruning Shears: Sharp, sterilized shears for cuttings or trimming.
- ● Garden Gloves: Heavy-duty gloves to protect hands from thorns.
- ● Spray Bottle: For misting seeds or cuttings (hold 8–12 oz).
- ○ pH Test Kit (Optional): To verify soil acidity before planting.
- ● Fertilizer: Slow-release balanced fertilizer (10-10-10) or acidic plant food (e.g., Miracle-Gro Azalea/Camellia).
- ● Sunlight: Partial shade to full sun (6+ hours of indirect light daily).
- ● Climate: Hardy in USDA Zones 5–9; avoid frost-prone areas for young plants.
- ● Watering Schedule: Keep soil consistently moist (not soggy) for the first 3 months.
Step-by-step guide to cultivating inkberry holly for lush year-round beauty
This hardy shrub thrives with minimal fuss—here’s how to grow it into a dense, evergreen statement piece.
🌱 Step 1: Select the Perfect Planting Site
Inkberry holly flourishes in partial shade to full sun, but I’ve found it tolerates morning sun with afternoon shade best in hotter climates. Look for a spot with well-draining soil—this plant hates soggy roots. If your soil is heavy clay, amend it with 2-3 inches of compost before planting to improve drainage.
Space your plants 4-6 feet apart to allow for mature growth. Inkberry holly grows into a rounded shrub, so give it room to spread without competing with other plants. Dig a hole twice as wide as the root ball but only as deep—planting too deep can suffocate the roots and cause stress.
🪴 Step 2: Plant with Care for Strong Establishment
Remove the plant from its container and gently loosen the roots if they’re circling. Place it in the hole so the top of the root ball sits level with the surrounding soil—burying the stem too deep can lead to rot. Backfill with native soil, tamping lightly to eliminate air pockets.
Water deeply right after planting to settle the soil and eliminate gaps. You’ll know it’s done when the surface looks firm and no air pockets remain. Mulch around the base with 2-3 inches of organic mulch, keeping it 3 inches away from the stem to prevent moisture buildup that can cause disease.
☀️ Step 3: Water and Maintain for Healthy Growth
Inkberry holly is drought-tolerant once established, but young plants need consistent moisture for the first 12-18 months. Water deeply once a week during dry spells, ensuring the soil is moist 6 inches down. You’ll know it’s time when the top inch feels dry to the touch—this prevents overwatering while keeping roots happy.
Fertilize lightly in early spring with a balanced, slow-release fertilizer (10-10-10). Too much nitrogen leads to leafy growth at the expense of berries. Prune lightly in late winter or early spring to shape the shrub and remove any dead or crossing branches. Always use clean, sharp pruners to avoid tearing the bark.
✂️ Step 4: Encourage Blooms and Berries
Inkberry holly produces small, white flowers in late spring, followed by dark purple-black berries that persist through winter. To encourage flowering, prune lightly in late winter—never cut back more than 1/3 of the plant at once. This preserves the structure while stimulating new growth.
Birds love the berries, so if you’re planting near a bird-feeding area, consider one or two plants—they’ll provide food and shelter. The berries add a striking contrast against the glossy evergreen leaves, making this plant a standout in any landscape.
🌿 Step 5: Protect and Enjoy Year-Round Interest
Inkberry holly is deer-resistant and drought-tolerant, making it a low-maintenance choice for almost any garden. In winter, the berries provide food for wildlife, while the glossy leaves add texture to snow-covered landscapes. If you notice yellowing leaves, it’s often a sign of overwatering or poor drainage—adjust your care routine accordingly.
With proper spacing and care, your inkberry holly will grow into a dense, multi-stemmed shrub that thrives for decades. Its evergreen foliage and winter berries ensure year-round interest with almost no effort—just the perfect shrub for a fuss-free garden.
Tips & tricks for cultivating inkberry holly with confidence
These simple yet game-changing strategies will help you grow a thriving inkberry holly that stays lush and vibrant all year long.
Soil Preparation Secret: Before planting, test your soil's drainage by digging a hole and filling it with water. If it doesn't drain within 30 minutes, you definitely need to amend that heavy clay soil with compost. I've seen inkberry holly plants struggle in soggy soil, so don't skip this step—it's the foundation for healthy roots. The 2-3 inches of compost recommendation isn't just about drainage; it also introduces beneficial microbes that help your plant establish itself faster.
Planting Depth Matters: When placing your inkberry holly in the hole, use a small stick or level to ensure the top of the root ball sits exactly level with the surrounding soil. Burying it too deep can suffocate the plant, while planting too shallow exposes roots to drying out. This is especially important for young plants that are still establishing their root systems. Think of it like Goldilocks—you want it just right!
Watering Wisdom: The key to watering inkberry holly is consistency during those first 12-18 months. Instead of watering lightly every day, focus on deep watering once a week. Use your finger to check the top inch of soil—when it feels dry, that's your cue. This encourages deep root growth rather than shallow, weak roots that can't support your plant as it matures. A moisture meter can be a great investment if you're unsure.
Pruning Strategy: When you prune in late winter or early spring, focus on removing only the dead, diseased, or crossing branches. I can't stress enough how important it is to never cut back more than 1/3 of the plant at once. This preserves the natural shape while encouraging new growth. And always use clean, sharp pruners—dull tools can tear the bark and create entry points for diseases. Think of pruning as giving your plant a haircut rather than a drastic makeover.
Pro Tips for Inkberry Holly Flower
- These simple yet game-changing strategies will help you grow a thriving inkberry holly that stays lush and vibrant al...
- Soil Preparation Secret: Before planting, test your soil's drainage by digging a hole and filling it with water. If i...
- Planting Depth Matters: When placing your inkberry holly in the hole, use a small stick or level to ensure the top of...
Frequently asked questions
Got questions about growing inkberry holly flowers? You’re not alone! Here are some of the most common queries—plus straightforward answers to help you cultivate this stunning evergreen with confidence.
Do inkberry hollies actually produce flowers?
Yes! While they’re prized for their glossy, dark foliage, inkberry hollies (Ilex glabra) are dioecious, meaning male and female plants must be present for pollination. Male plants produce delicate, small white flowers in spring, while female plants (if pollinated) yield tiny red berries. Pro tip: Plant at least one male for every 5-6 females to ensure berries!
How long does it take for inkberry holly to flower?
Inkberry hollies typically take 3–5 years to mature enough for flowering, depending on growing conditions. Young plants focus on root and foliage growth first. Patience pays off—once established, they bloom reliably in spring (March–May in most zones). Use mulch and consistent watering to speed up maturity!
Can I grow inkberry holly in containers?
Inkberry hollies thrive in containers, making them perfect for patios or small gardens. Choose a 5-gallon pot or larger with drainage holes and well-draining soil. Prune regularly to control size, and move pots to partial shade in hot climates. Just ensure the container stays moist—drought stress can delay flowering.
Why aren’t my inkberry holly flowers turning into berries?
Missing berries usually mean one of three things: no male plant nearby, poor pollinator activity (like bees), or environmental stress (drought, extreme heat). Check for male plants within 30 feet, or hand-pollinate with a soft brush. Planting near native pollinator-friendly flowers (like azaleas) can boost success!
Are inkberry hollies cold-hardy enough for northern climates?
Yes! Inkberry hollies are highly cold-tolerant, surviving down to USDA Zone 5 (and even colder with protection). They handle snow and frost well, though young plants may need winter mulch. In Zone 6+, they flourish with minimal care. Just avoid soggy soil in winter to prevent root rot.
Wrapping up and next steps
The inkberry holly flower is a stunning, low-maintenance addition to any garden, offering year-round beauty with its glossy leaves and delicate blooms. Whether you’re drawn to its evergreen charm or its wildlife-friendly appeal, growing this plant is a rewarding experience for gardeners of all levels.
Ready to transform your outdoor space? Start by choosing the perfect spot, gather your supplies, and dive in—your inkberry holly’s vibrant future awaits! 🌿✨
- Next step: Pick a sunny or partially shaded area and plant your inkberry holly this season!