Shrubs
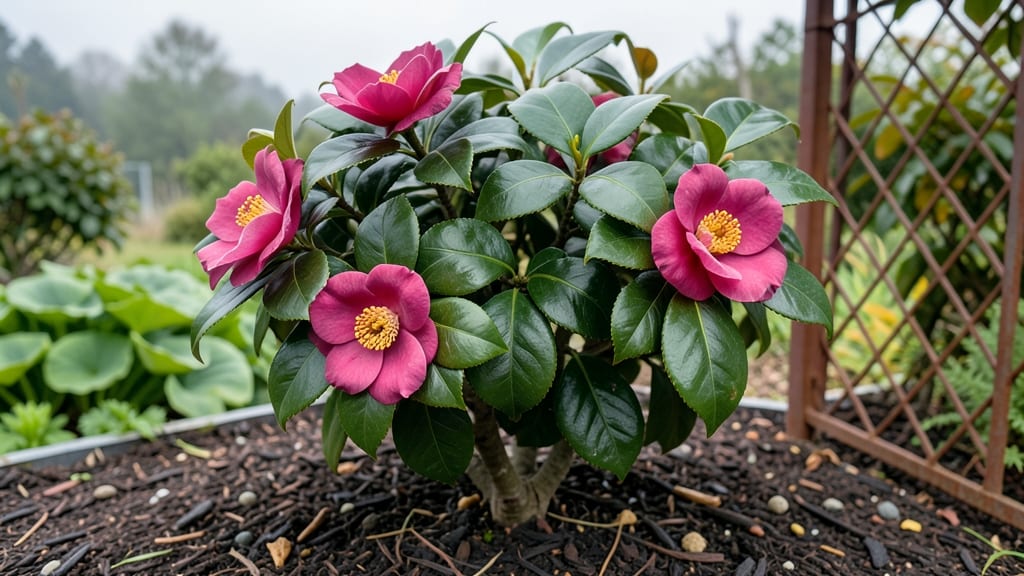
Camellia flowering shrubs bring year-round elegance with their glossy leaves and fragrant blooms, but growing them right means understanding their picky nature. 🌿 I’ve learned the hard way that these beauties thrive only when you match their exact needs—acidic soil, partial shade, and precise pruning.
The payoff? A shrub that flowers from late fall through spring, filling your garden with intoxicating perfume.
Start with the right location: camellias hate full sun in hot climates but need bright light to bloom. Amend heavy clay soil with 3-4 inches of peat moss or pine bark to keep it acidic (pH 5.0–6.0), and water deeply once a week—more in summer, less in winter.
Fertilize lightly in early spring with an acid-loving plant formula to avoid leaf burn, and avoid high-nitrogen feeds that encourage foliage over flowers.
The secret to long-term blooms lies in pruning after flowering. Cut back leggy growth to shape the shrub while leaving 1/3 of old wood—this is where next year’s buds form.
Deadhead spent blooms promptly to encourage new ones, and watch for petal blight or scale insects, which can ruin a season. With the right care, your camellia will reward you with glossy, evergreen foliage and clusters of roses that last for months.
Works best in USDA Zones 7–10, though some varieties handle Zone 6 with winter protection. For container growing, choose dwarf types like ‘Yuletide’ and use a 15-gallon pot with drainage. The key is patience—camellias take 2–3 years to mature but become the showstopper of any garden once established.
📚 In This Guide
- What you need
- Instructions
- Tips and common mistakes
- Wrapping up and next steps
What you need
- ● Camellia shrub: Choose between Camellia japonica (hardy, cold-tolerant) or Camellia sasanqua (blooms later, more heat-tolerant). Buy from a reputable nursery.
- ○ Well-draining soil: 50% acidic potting mix (pH 5.0–6.5) + 50% organic matter (peat moss, compost, or pine bark fines). Optional: Add 1 cup of sulfur per cubic yard to lower pH if needed.
- ● Container (if potted): 1–2 gallons per year of plant age (e.g., 15-gallon pot for a 5-year-old shrub). Ensure drainage holes!
- ● Fertilizer: Balanced fertilizer (10-10-10): 1 tbsp per foot of plant height spring and fall.
- ● Acid-loving plant fertilizer: 2 tbsp per foot during bloom season (e.g., Miracle-Gro Azalea/Camellia).
- ● Mulch: 2–3 inches of pine bark or shredded leaves to retain moisture and acidity.
- ● Pruning shears: Bypass pruners (sharp, clean, and sterilized with rubbing alcohol).
- ● Gloves: Heavy-duty gardening gloves to protect from thorns.
- ● Hose or watering can: For deep watering (1–2 inches per week).
- ○ Pruning sealant (optional): Wound dressing for large cuts (e.g., Tree Help).
- ○ Stakes & twine (optional): For young, top-heavy plants in windy areas.
- ● Sunlight: Camellia japonica: Partial shade (3–6 hours of sun). Camellia sasanqua: Full sun to partial shade.
- ● Temperature: Plant in USDA Zones 7–9 (or protect young plants in colder zones with burlap wraps).
- ● Humidity: Thrives in 50–70% humidity; consider a humidifier for indoor plants.
Step-by-Step instructions for planting and pruning camellias
Here’s how to establish your shrubs for maximum blooms and longevity.
🌱 Step 1: Select and Prepare the Planting Site
Camellias thrive in partial shade—choose a spot that receives morning sun and afternoon dappled light, especially in hotter climates. The soil should be acidic (pH 5.0–6.5) and well-draining, as soggy roots lead to root rot. If your native soil is alkaline, amend it with 2–3 inches of peat moss or sulfur mixed into the top 12 inches of soil.
Dig a hole twice as wide as the root ball but only as deep—planting too deeply suffocates the roots. Loosen the root ball gently if it’s tightly bound, then place the shrub so the top of the root ball sits 1 inch above ground level. This prevents water from pooling at the base.
💧 Step 2: Water Deeply and Mulch for Moisture Retention
After planting, water deeply until moisture seeps 6 inches down into the soil. Camellias need consistent moisture but hate soggy conditions, so aim for 1–2 inches of water per week, adjusting for rainfall. Use a soaker hose to avoid wetting the foliage, which can invite fungal diseases like petal blight.
Spread 2–3 inches of organic mulch (like pine bark or shredded leaves) around the base, keeping it 3 inches away from the trunk. Mulch locks in moisture, regulates soil temperature, and slowly releases nutrients as it breaks down. Refresh the mulch annually to maintain its protective layer.
☀️ Step 3: Prune for Shape and Bloom Health
Prune immediately after flowering (late spring) to encourage next year’s blooms. Remove dead, crossing, or weak branches first, cutting just above a outward-facing bud. Avoid heavy pruning—camellias bloom on old wood, so limit yourself to light shaping (no more than 25% of the canopy) to preserve next season’s flower buds.
For established shrubs, thin out overcrowded branches to improve airflow, which reduces disease risk. Never prune in fall or winter—this removes next year’s flower buds before they form. Use clean, sharp pruners and sterilize them with rubbing alcohol between cuts to prevent spreading pathogens.
✂️ Step 4: Fertilize and Monitor for Pests
Feed camellias twice a year: in early spring (before new growth starts) and mid-summer (after the first flush of blooms). Use an acid-loving plant fertilizer (like 8-3-9 or 10-10-10) at half the recommended strength to avoid burning roots. Scatter granules 6 inches away from the trunk and water deeply to activate them.
Watch for aphids, scale, or spider mites, which thrive on stressed plants. Spray infested areas with neem oil or insecticidal soap early in the day to avoid harming beneficial insects. If yellowing leaves appear, they may signal iron deficiency—apply chelated iron to the soil and check pH levels again.
🌿 Step 5: Winter Care for Cold-Hardy Varieties
Most camellias (like Camellia japonica and Camellia sasanqua) tolerate USDA Zones 7–9, but younger plants or tender varieties need winter protection. Wrap the base of the shrub with burlap or tree wrap to shield it from winter sunburn (a condition where cold, dry air cracks bark). Avoid heavy mulch in winter—2 inches is enough to insulate roots without suffocating them.
If your area experiences freezing temperatures below 10°F, drape a frost cloth over the shrub and secure it loosely. Remove it on mild days to prevent moisture buildup, which can rot buds. Resume regular watering in early spring as new growth appears.
Tips & tricks for perfect Camellia flowering shrub care
A few key strategies will help you transform your camellias into a fragrant, blooming powerhouse year after year.
Soil Preparation Secret: When amending your soil with 2-3 inches of peat moss or sulfur in Step 1, test your pH first—camellias demand acidity between 5.0 and 6.5. I've seen gardeners skip this and end up with stunted growth. Use a simple soil test kit, and if your pH is above 6.5, consider adding elemental sulfur gradually over time—it takes months to adjust pH properly.
Pruning Precision: In Step 3, when you're pruning immediately after flowering, focus on creating an open center by removing crossing branches. This isn't just about aesthetics—it's about airflow, which dramatically reduces fungal diseases like petal blight. I always make my cuts just above an outward-facing bud, and I never remove more than 25% of the canopy. The key is patience; camellias reward gentle pruning with more abundant blooms next season.
Winter Protection Strategy: For those chilly nights below 10°F in Step 5, I've found that wrapping the base with burlap isn't enough protection for tender varieties. Add a layer of frost cloth over the entire shrub, but leave it loose—tight wrapping can trap moisture and cause bud rot. Remember to remove it on mild days to prevent moisture buildup, which can be just as damaging as the cold itself.
Pro Tips for Camellia Flowering Shrub
- A few key strategies will help you transform your camellias into a fragrant, blooming powerhouse year after year.
- Soil Preparation Secret: When amending your soil with 2-3 inches of peat moss or sulfur in Step 1, test your pH first...
- Pruning Precision: In Step 3, when you're pruning immediately after flowering, focus on creating an open center by re...
Frequently asked questions
When do camellias bloom, and how long does the flowering last?
Camellias typically bloom in late fall through winter (November–February), though some varieties may flower in early spring. A single bloom can last 2–4 weeks per flower, with the entire shrub producing flowers for 6–12 weeks depending on care and variety. Cold-hardy types (like Camellia sasanqua) often bloom earlier than tender Camellia japonica.
Can camellias survive winter frost? What’s the best protection?
Most camellias thrive in USDA Zones 7–9, but they can tolerate brief light frost (down to 15°F). For colder climates, mulch heavily (3–4 inches of organic mulch) and wrap young shrubs in burlap or frost cloth. Avoid heavy snow buildup—gently brush it off branches to prevent breakage.
Why aren’t my camellia flowers opening? Troubleshooting tips.
Unopened buds often signal environmental stress. Check for:
- Too much shade (needs partial sun, 4–6 hours daily).
- Overwatering (soggy roots = bud drop). Let soil dry slightly between waterings.
- Nutrient deficiency (apply acidic fertilizer in early spring).
- Sudden temperature swings (e.g., warm days + freezing nights).
How and when should I prune my camellia shrub?
Prune right after flowering (late winter/early spring) to shape the shrub and remove dead wood. Avoid heavy pruning—camellias bloom on old wood, so keep cuts minimal. Use sterilized shears and focus on:
- Thinning crowded branches for airflow.
- Trimming back 1/3 of the oldest stems to rejuvenate growth.
- Avoid cutting into buds or flower stems.
Are there fragrant camellia varieties? What’s the most aromatic?
Yes! Camellia japonica ‘Yuletide’ and ‘Donation’ are top picks for their rich, spicy fragrance. Other scented varieties include:
Fun fact: Some camellias release fragrance at night, attracting pollinators!
Wrapping up and next steps
Growing a camellia flowering shrub is a rewarding journey that brings year-long beauty and fragrance to your garden! 🌸 With the right care—from well-drained soil to strategic pruning—you’ll enjoy stunning blooms that last from late fall through winter. Don’t wait to start! Grab your pruners, pick a sunny spot, and watch your camellia thrive with confidence.
Next step: Plant your first camellia this season and share your progress with fellow gardening enthusiasts. Happy growing! 🌱