Pruning
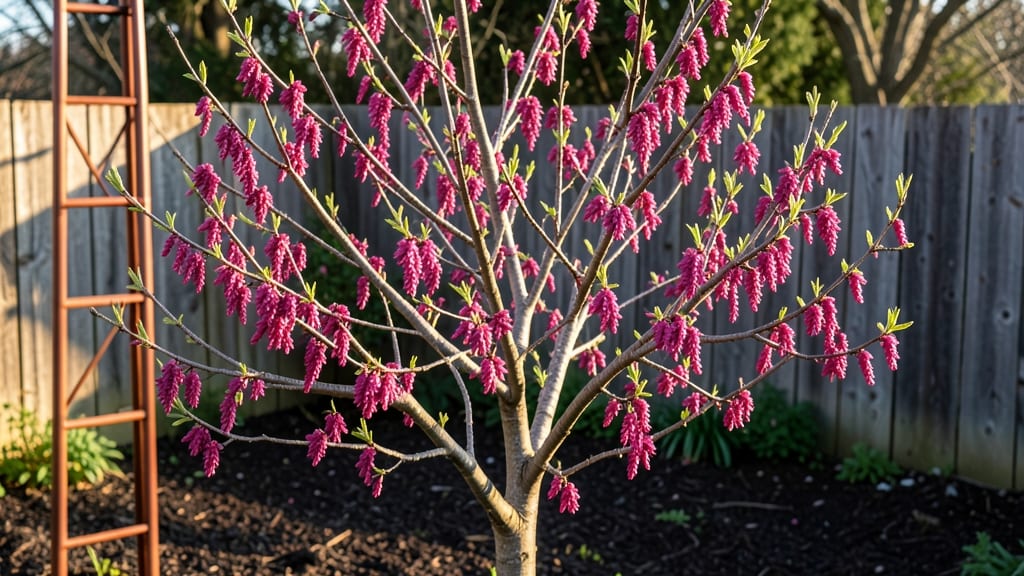
Your flower tree branches aren't just leftover prunings—they're the secret weapon for turning your garden into a living sculpture gallery. ✨ I learned this after transforming a tangle of overgrown lilac branches into a dramatic focal point that neighbors now ask about.
The right cuts reveal the tree's natural architecture, turning winter bare branches into year-round art.
Start with clean, sharp pruners and focus on removing crossing or crowded branches first. Aim for clean cuts just outside the branch collar, and don't worry about perfect angles—organic shapes create the most striking visuals.
For immediate impact, bundle 3-5 branches together with twine and lean them against a fence or wall to create instant vertical interest.
What you'll end up with is a garden that feels like a designer showpiece without the price tag. The branches add unexpected texture to flower beds, frame pathways when laid horizontally, or even become the backbone of winter wreaths.
Pair them with evergreens or late-blooming perennials for year-round contrast that makes your space stand out.
This technique works for almost any flowering tree—lilacs, dogwoods, crabapples, or even overgrown roses. The key is pruning at the right time (late winter or early spring) when the tree is dormant but before new growth starts.
Your garden will transform from ordinary to extraordinary with just a few strategic cuts.
📚 In This Guide
- What you need
- Instructions
- Tips and common mistakes
- Wrapping up and next steps
What you need
- ● Flowering tree branch(es): 3–5 mature, healthy branches (1.5–3 inches in diameter) from a deciduous or evergreen tree (e.g., cherry, dogwood, or magnolia). Tip: Choose branches with buds or blooms for maximum impact!
- ● Pruners or loppers: 1 pair of bypass pruners (for clean cuts) and 1 pair of loppers (for thicker branches). Pro tip: Sharpen blades beforehand for smooth, precise cuts!
- ● Rope or twine: 10–15 feet of weather-resistant jute or nylon rope (¼-inch thickness) for securing branches.
- ● Support structure: Option 1: A metal or wooden trellis (4x4 feet or larger).
- ● Option 2: A freestanding frame (e.g., PVC pipes or rebar bent into an arch).
- ○ Pruning sealant: 1 small bottle of tree wound sealant (optional but recommended for large cuts).
- ● Safety gear: Work gloves, safety goggles, and long sleeves.
- ● Measuring tape: 1 tape measure (for spacing branches evenly).
- ● Scissors or wire cutters: For trimming rope.
- ○ Optional decor: Small garden stakes to anchor branches temporarily.
- ● Non-toxic paint or stain to highlight cuts or branches (for artistic flair!).
- ● Choose a sunny, sheltered spot in your garden for optimal branch health.
- ● Plan your design: Sketch or visualize the shape and flow of your sculptural arrangement.
- ● Prune branches in early spring or late winter (before buds swell) for best results.
How to prune flower tree branches for stunning architectural drama
Transform your flower tree into a living sculpture with these precise pruning techniques.
🌿 Step 1: Assess Branches for Structural Balance
Start by examining your tree from all angles—look for branches that create natural lines or contrast with others. I focus on three key elements: thickness, direction, and position. Thicker branches should form the main framework, while thinner ones fill gaps. Use your hand as a guide: if a branch is wider than your wrist, it’s a structural branch worth keeping.
Next, check branch direction. Ideal branches grow outward and upward, creating a natural vase shape. If a branch rubs against another or grows straight up (like a flagpole), it’s a candidate for removal. Finally, position matters—branches should be spaced evenly along the trunk, not clustered. Step back frequently to visualize the tree’s silhouette.
✂️ Step 2: Make Clean Cuts at the Right Angle
Always prune on a dry day when the tree isn’t stressed. Use sharp, clean pruning shears or a saw for thicker branches. Cut just outside the branch collar—the swollen area where the branch meets the trunk. This ensures the tree seals the wound properly. For branches thicker than 2 inches, make a 45-degree cut about 1/4 inch outside the branch collar, then follow up with a horizontal cut just above the collar.
Never leave stubs—this invites disease. If you’re unsure where to cut, trace the branch’s natural curve with your finger. The cut should follow that line, not guesswork. For smaller branches, a single clean cut at the collar is all you need. Work methodically from the bottom up, removing smaller branches first to avoid damaging larger ones.
☀️ Step 3: Shape for Light and Airflow
After removing dead or crossing branches, step back and imagine sunlight filtering through the tree. Your goal is to create an open, airy structure where light reaches the center. I like to leave 3-5 main branches evenly spaced around the trunk, each with its own smaller branches fanning out. This mimics the natural shape of mature trees and encourages future blooms.
Pay special attention to the tree’s inner canopy. If branches block light from reaching the center, thin them out by removing one-third of the smallest branches in that area. You’ll see new growth sprout from the center within 4-6 weeks, signaling you’ve improved airflow and sunlight exposure. Avoid heavy pruning in late summer—this stimulates new growth that won’t harden off before winter.
🌱 Step 4: Encourage New Growth with Strategic Cuts
To promote flowering, focus on heading cuts—trimming just above a leaf node or bud. This redirects the tree’s energy into new shoots. For example, if a branch has a cluster of buds, cut back to the strongest one. Avoid cutting into old wood (gray or woody stems), as this reduces flowering potential. Instead, target green, flexible branches with visible buds.
After pruning, apply a thin layer of pruning sealant to cuts larger than 1/2 inch to prevent disease. Within 2-3 weeks, you’ll notice new shoots emerging from the cut points. These will become next year’s blooms if given proper care. Water deeply after pruning to help the tree recover, but avoid overwatering—soil should stay moist but not soggy for the first 2 weeks post-pruning.
⏰ Step 5: Maintain Year-Round with Seasonal Checks
Schedule a quick inspection every 3 months to remove any dead, diseased, or crossing branches. Winter is the best time for major structural pruning, while late winter or early spring (just before buds swell) is ideal for flowering trees. Avoid pruning in fall—this can stimulate late-season growth that won’t harden off before frost.
Keep a notebook or take photos of your tree after each pruning session. This helps track progress and ensures you don’t over-prune. Over time, your tree will develop a distinctive silhouette that stands out in the garden. The key is patience—sculptural pruning is a gradual process, but the architectural drama is worth the effort.
Tips & tricks for sculptural pruning of flower trees
Transforming your flower tree into a living work of art takes precision—and these pro tips will help you avoid common mistakes that ruin the architectural effect.
Visualize the Final Silhouette: Before making any cuts in Step 1, sketch a rough outline of your tree's ideal shape on paper. This simple exercise forces you to think about the big picture. I've found that stepping back every 10 feet helps me see the tree's natural lines without getting too close to the details. Look for branches that create interesting shapes—think of your tree as a living sculpture where every cut should enhance the overall form.
Tool Maintenance is Critical: Sharp tools make all the difference, especially in Step 2 when you're working with the branch collar. I keep my pruning shears and saws razor-sharp by cleaning them with rubbing alcohol after each use and sharpening them every 3-4 pruning sessions. Dull tools crush branches instead of making clean cuts, which stresses the tree and invites disease. For branches thicker than 2 inches, I use a fine-tooth saw that leaves a clean cut—never a jagged one.
Seasonal Timing Matters: The instructions mention ideal seasons, but here's what I've learned about the timing in Step 3: late winter (just before buds swell) is perfect for flowering trees because you're pruning when the tree is dormant but about to wake up. I've made the mistake of pruning in early spring when buds were already forming—this can remove potential blooms. For non-flowering trees, summer is actually a better time to shape, but always avoid late summer pruning as it stimulates tender new growth that won't survive winter.
Pruning Sealant Strategy: In Step 4, when applying sealant to cuts larger than ½ inch, I've found that less is more. A thin layer is all you need—thick applications can actually trap moisture and promote rot. I use a small paintbrush to apply it sparingly, focusing only on the cut edges. For smaller cuts, sealant isn't necessary at all—the tree's natural healing response is usually sufficient. The key is to work quickly and efficiently to minimize stress on the tree.
Pro Tips for Flower Tree Branch
- Transforming your flower tree into a living work of art takes precision—and these pro tips will help you avoid common...
- Visualize the Final Silhouette: Before making any cuts in Step 1, sketch a rough outline of your tree's ideal shape o...
- Tool Maintenance is Critical: Sharp tools make all the difference, especially in Step 2 when you're working with the ...
Frequently asked questions
Got questions about sculpting flower tree branches for that dramatic garden look?
Here are some of the most common ones—plus quick, actionable answers to keep your pruning game sharp!
When is the best time to prune flower tree branches for maximum blooms?
The ideal time depends on your tree type! For spring-flowering trees (like lilacs or magnolias), prune right after blooming—this prevents cutting off next year’s flowers. For summer/fall-flowering varieties (e.g., crape myrtles), prune in late winter or early spring before new growth starts. Always avoid heavy pruning during active bloom.
How do I prune flower tree branches to create a sculptural look without harming the tree?
Start with clean cuts at a 45-degree angle, just above a bud or branch collar. Remove dead, crossing, or overcrowded branches first, then shape by thinning out 1/3 of the oldest branches to encourage new growth. Use hand pruners for small branches and a pruning saw for thicker limbs. Never remove more than 25% of the canopy at once!
Can I propagate a flower tree branch from a cutting? If so, how?
Yes! Many flowering trees (like hibiscus, bougainvillea, or forsythia) root easily from semi-hardwood cuttings. Take 4–6-inch cuttings in late spring or early summer, strip lower leaves, and dip in rooting hormone. Plant in moist potting mix, cover with a plastic bag, and keep in bright, indirect light. Roots should form in 4–8 weeks!
What should I do if my pruned flower tree branch isn’t healing properly?
If cuts look ragged, ooze sap, or show signs of disease (mushrooms, discoloration), act fast! Clean tools with rubbing alcohol, apply pruning sealant to large wounds, and monitor for pests. For severe cases, remove the infected branch entirely and dispose of it. Thin, watery sap is normal—just keep the area dry to prevent rot.
Are there any flower tree branches I should never prune myself?
Leave mature, established trees (especially oaks, elms, or large flowering cherries) to professionals if branches are over 2 inches thick or the tree is near power lines. Also, avoid pruning protected species (like some native magnolias) without checking local regulations. When in doubt, consult an ISA-certified arborist!
Wrapping up and next steps
Transforming a flower tree branch into a stunning sculptural masterpiece isn’t just about skill—it’s about patience, creativity, and a love for nature’s artistry.
Whether you’re shaping a wisteria arch, training a climbing rose, or refining a weeping cherry, the key is to embrace the process and let your garden tell its own story. 🌸
Ready to bring your vision to life? Grab your tools, sketch a rough plan, and start small—every cut is a step toward a breathtaking garden centerpiece. Your green thumb and artistic eye are all you need!
- Next step: Pick a branch and begin with confidence—your garden’s drama awaits! 🌿