
Flowers
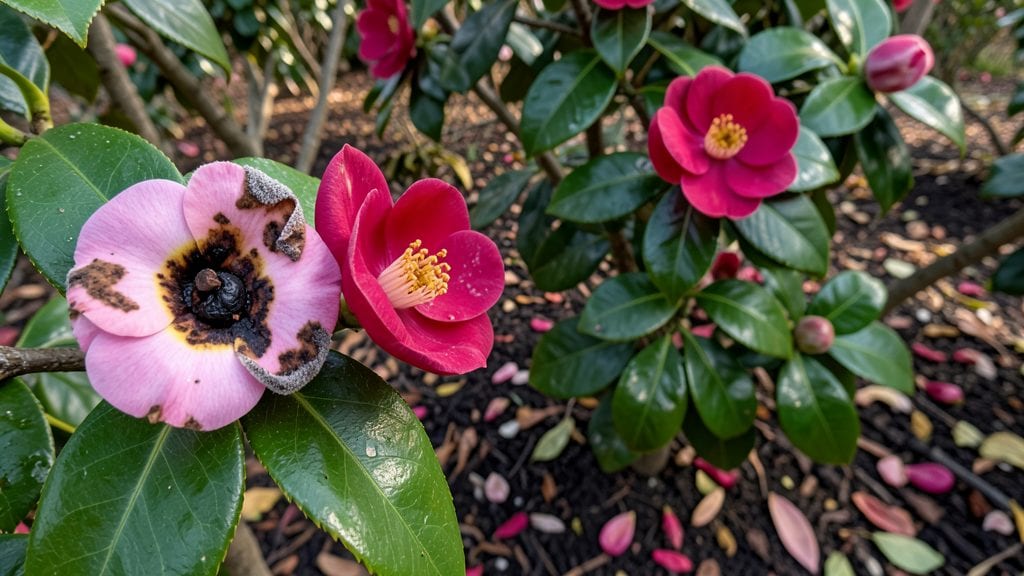
That first sight of brown, mushy petals on your camellias isn’t just ugly—it’s a fungal infection called flower blight, and it spreads fast if you don’t act. 🌿 I’ve seen this ruin entire blooms in just a few days, but the good news?
You can stop it with simple, organic fixes before it takes over.
The problem starts with wet petals or crowded flowers—perfect conditions for fungus to move in. Heavy rain, poor air circulation, or overwatering create the perfect storm.
I learned the hard way when my prized ‘Yuletide’ camellia lost half its blooms last spring, but now I know exactly how to prevent it: prune for airflow, water at the base, and clean up fallen petals.
You’ll save your camellias with a mix of copper fungicide (sprayed early morning), neem oil (for prevention), and better pruning habits. Within weeks, you’ll see fresh buds opening up clean and strong, with no more mushy mess. The key is catching it early—before the fungus moves to the leaves.
Works for both old garden camellias and new hybrids, and the same tricks prevent other fungal issues like petal blight. Let’s get those blooms back to their best before the next shower rolls in.
Understanding The Root Causes
Camellia flower blight—whether it appears as blackened petals, gray mold, or stunted buds—is rarely a random event. Instead, it’s a symptom of environmental stress, fungal invasion, or poor plant health.
By pinpointing the exact trigger, you can take precise action to save your camellias. Below, we break down the most common culprits, explained in simple terms with science-backed insights.
Fungi like Botrytis cinerea (gray mold) and Phomopsis thrive in humid, stagnant air. These pathogens spread when:
- Nighttime dew lingers on petals for >12 hours—ideal for fungal spores to germinate.
- Poor air circulation traps moisture (e.g., dense foliage, overcrowded plants, or shaded areas).
- Rain or overhead watering wets flowers directly, creating a "soup" for spores to feed on.
Pro tip: 🌡️ Use a hygrometer to monitor humidity—keep it <40% during blooming season to starve fungi.
Camellias need unobstructed airflow to dry quickly after rain or dew. When branches touch or mulch piles up:
- Stagnant air slows evaporation, keeping petals damp longer.
- Spores hitchhike on water droplets, spreading from infected to healthy blooms.
- Thick mulch layers (over 3 inches) trap moisture at the base, inviting root rot—weakening the plant’s defenses.
Actionable fix: 🔪 Prune 1/3 of dense branches annually to improve airflow. Space plants <3–4 feet apart.
Camellias are semi-evergreen, meaning they tolerate some drought—but not soggy roots. Overwatering leads to:
- Weakened stems (can’t support heavy blooms, increasing breakage risk).
- Fungal entry points through stem wounds or cracked bark.
- Nutrient dilution in the soil, making plants more susceptible to disease.
Watering hack: ⏰ Use the "finger test"—insert your finger 2 inches into soil. Water only if it’s dry. Drip irrigation (not sprinklers) delivers water to roots, not petals.
Even minor injuries—like thrips feeding, hail marks, or pruning cuts—create open doors for pathogens. Here’s how:
| Damage Type | How It Invites Blight | Solution |
|---|---|---|
| Thrip/sap-sucking pests | Leave sticky honeydew that attracts sooty mold fungi. | Spray with neem oil (1 tsp/gallon water) weekly. |
| Wind/hail bruising | Creates microscopic tears where spores land. | Prune damaged leaves below the injury with sterilized shears. |
| Over-fertilizing with nitrogen | Promotes soft, succulent growth—a fungal buffet. | Switch to balanced 10-10-10 fertilizer in spring. |
Pro tip: ✨ After pruning, dust cuts with cinnamon powder (natural antifungal) to seal wounds.
Camellias low in phosphorus (P) or potassium (K) produce weak stems and thin cuticles, making them vulnerable. Signs of deficiency:
- Yellowing leaves (P deficiency) → Slows flower development.
- Brown leaf edges (K deficiency) → Reduces disease resistance.
- Stunted buds** (magnesium or iron deficiency) → Leaves no energy for blooms.
Fix it fast: 💡 Apply bone meal (P) or greensand (K) in early spring. Test soil pH—camellias prefer 5.5–6.5.
Revive Your Camellias Naturally
When your camellia blooms start looking sad—spotted, wilting, or covered in unsightly blemishes—it’s time to take action. The good news? Most cases of camellia flower blight (or similar fungal and bacterial issues) can be treated with simple, organic solutions.
Below, we’ve mapped out practical fixes based on the most common causes, along with prevention tips to keep your camellias thriving.
Fungal blights like anthracnose or petal blight thrive in damp, humid conditions. If you spot dark spots, moldy growth, or petals dropping prematurely, act fast.
🔥 Step 1: Remove Infected Blooms & Leaves
- 👨🍳 Snip away any flowers or foliage showing signs of blight (black spots, yellowing, or slimy textures).
- ⏰ Do this in the morning when humidity is lower to reduce spore spread.
- 🗑️ Dispose of infected plant debris in the trash—not the compost—since fungi can survive there.
🍯 Step 2: Apply a Fungicide Spray
Use organic, copper-based sprays (like copper fungicide) or neem oil (1 tsp per quart of water + a drop of dish soap as an emulsifier).
- 🌡️ Spray in the early morning or late evening to avoid burning leaves in direct sunlight.
- 🎯 Reapply every 7–10 days until new growth appears healthy.
💡 Prevention Tip:
- 🌧️ Improve airflow by spacing plants 3–4 feet apart.
- 💦 Water at the base (not overhead) to keep petals dry.
Bacterial blights cause water-soaked lesions or oozing sores. If you see slimy patches or rapid wilting, bacteria may be the culprit.
🔪 Step 1: Sterilize Pruning Tools
- 🧼 Wipe tools with rubbing alcohol before and after trimming to prevent spreading bacteria.
- 🔄 Remove severely infected branches—bacteria can’t be cured, only contained.
🍳 Step 2: Use a Bacterial Blight Treatment
- 🥘 Mix 1 tsp baking soda + 1 quart water + a few drops of soap (this raises pH, making it hostile to bacteria).
- 👨🌾 Spray thoroughly, focusing on undersides of leaves and new growth.
- ✨ Repeat weekly until symptoms fade.
💡 Prevention Tip:
- 🌡️ Avoid overhead watering—bacteria love moisture on leaves.
- 🌿 Mulch with pine needles or straw to keep soil dry and reduce splashing.
Sometimes, sap-sucking pests (like scale or aphids) weaken camellias, making them prone to blight.
🚿 Step 1: Blast Off Pests with Water
- 💦 Use a strong hose spray to knock off aphids, mites, or scale.
- 🔄 Follow up with insecticidal soap (1 tbsp per quart of water) for stubborn pests.
🍎 Step 2: Strengthen Plant Immunity
- 💪 Feed with compost tea or fish emulsion (diluted) to boost natural defenses.
- 🌱 Prune for sunlight—thick, shaded foliage traps moisture and pests.
💡 Prevention Tip:
- 🌿 Introduce beneficial insects like ladybugs or lacewings to control pests naturally.
- 🍂 Clean up fallen leaves where pests hide over winter.
Even the hardiest camellias suffer when conditions are off. Tweak these factors to prevent future blight:
| Problem | Solution | Prevention Tip |
|---|---|---|
| Too much shade | Move to morning sun + afternoon shade | Plant in a spot with dappled light |
| Overwatering | Water deeply but less often (1–2x/week) | Use well-draining soil with perlite |
| Poor drainage | Amend soil with compost or sand | Plant in raised beds if needed |
| High humidity | Space plants wider (3–4 ft apart) | Use a fan on low setting in greenhouses |
Once your camellia recovers, keep it healthy with these pro tips:
- 🌿 Prune in late winter (before new growth) to improve airflow.
- 🍄 Monitor for early signs—catch blight before it spreads!
- 🌱 Choose resistant varieties like Camellia sasanqua (more disease-tolerant).
With these steps, your camellias will bounce back—and stay blight-free for seasons to come! 🌸💚
Frequently asked questions about camellia flower issues
What does camellia flower blight look like?
Look for dark brown or blackened petals that appear mushy or slimy, often with a gray fuzzy mold coating. Healthy petals should be vibrant and firm—any wilting or discoloration within 24-48 hours of rain is a red flag. Check the undersides of leaves too for yellow spots with dark borders, a classic sign of fungal spread.
Can I save my camellia if blight has already spread to the leaves?
Yes, but act fast! Prune all infected leaves below the damage using sterilized shears, then apply a copper fungicide or neem oil spray. For severe cases, repeat treatments every 7 days until new growth appears. The key is stopping the spread before it reaches the stems—once there, recovery becomes much harder.
Why does my camellia get blight every year?
Repeated outbreaks usually mean three common issues: poor airflow (crowded plants), overhead watering (wetting petals), or thick mulch trapping moisture. Check if your camellia sits in shade all day (fungi love damp, dark conditions) or if you’ve been using sprinklers instead of drip irrigation. A simple fix is to prune 1/3 of dense branches and switch to morning watering at the base.
Is baking soda safe to treat camellia blight?
Yes, but only for bacterial blight (not fungal). Mix 1 tsp baking soda + 1 quart water + a drop of soap and spray on dry leaves in the morning. For fungal blight, baking soda won’t work—use copper fungicide instead. Always test on a small leaf first to check for sensitivity. Baking soda raises leaf pH, creating an inhospitable environment for bacteria.
How do I prevent blight in new camellia plants?
Start with proper spacing (3-4 feet apart) and well-draining soil mixed with perlite. Water only at the base in the morning, and avoid planting in low spots where water pools. For extra protection, apply a neem oil spray every 2 weeks during blooming season—it’s a natural fungicide that also deters pests.