
Lawn
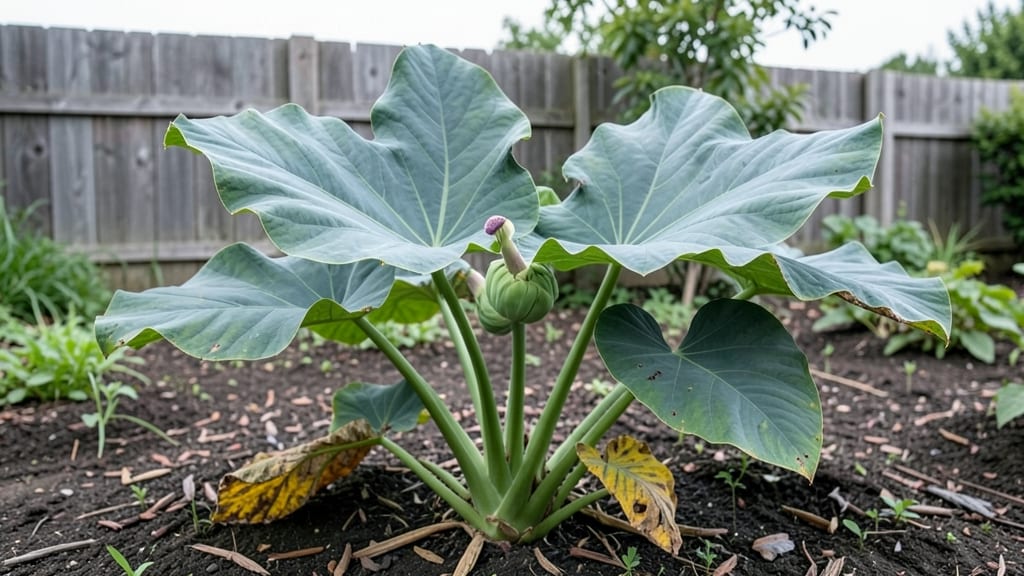
Growing taro flower seeds from scratch starts with patience and the right tropical conditions. 🌱 I’ve learned that these seeds need warmth, humidity, and consistent moisture to break dormancy—something most gardeners overlook. The key isn’t just planting them; it’s mimicking their native jungle environment to coax those first fragile sprouts.
You’ll need a warm spot—75-85°F—and a mix of peat moss or coconut coir to keep moisture without drowning the seeds. Most people rush this step and end up with mold instead of seedlings.
I’ve found that a clear plastic dome or even a sealed container creates the humidity they crave, cutting germination time from weeks to just 10-14 days.
Once those first heart-shaped leaves appear, you’ll know you’re on the right track. The plants grow fast—6-12 inches in a month—if you keep the soil damp but not soggy.
That’s when the real magic happens: with proper care, you’ll see arrow-shaped leaves unfurl, followed by the dramatic blooms taro is famous for.
This method works for both outdoor gardens in warm climates and indoor setups with grow lights. The biggest challenge? Keeping conditions steady—too much cold or dry air stalls growth. But once you crack the code, you’ll have lush, flowering taro that’s the envy of any tropical garden.
📚 In This Guide
- What you need
- Instructions
- Tips and common mistakes
- Wrapping up and next steps
What you need
- ● Taro flower seeds (or corms) – 5–10 seeds (or small corms) for a starter patch.
- ● Well-draining potting mix – 2–3 gallons (use a blend of coconut coir, perlite, and peat moss for moisture control).
- ● Containers or seed trays – 6–12-inch pots (or trays with drainage holes) for seedlings.
- ● Spray bottle – For gentle watering during germination.
- ● Grow lights or sunny window – 6–8 hours of indirect light daily (or artificial grow lights for 12–14 hours).
- ● Humidity dome or plastic wrap – To maintain moisture while seeds sprout.
- ○ Gloves (optional but recommended) – Taro plants can have mild irritants.
- ● Small hand trowel – For transplanting seedlings.
- ○ pH testing kit (optional) – Ideal soil pH: 5.8–6.5 (taro thrives in slightly acidic soil).
- ● Fertilizer (balanced 10-10-10 or organic compost) – Light application after germination.
- ● Patience & warmth! – Taro seeds need 75–85°F (24–29°C) to germinate (use a heat mat if needed).
Step-by-step instructions for germinating taro flower seeds
Here's the foolproof method I've used to coax these tropical beauties from stubborn seeds.
🌱 Step 1: Prepare the Seeds for Faster Germination
Taro seeds have a tough outer coating that slows germination. First, soak them in lukewarm water for 24 hours to soften the shell. Place them in a small bowl and cover completely—they'll sink to the bottom. You'll see tiny cracks appear after 12-18 hours, signaling the coating is breaking down.
After soaking, gently rub the seeds between your fingers to remove any remaining outer layer. This step is crucial—skipping it can delay germination by 2-3 weeks. Discard any seeds that remain hard or show no signs of softening, as they likely won't sprout.
💧 Step 2: Set Up the Warm, Humid Germination Environment
Taro seeds need warmth and consistent moisture to germinate. Fill a small container with moistened sphagnum moss or a mix of 50% coconut coir and 50% perlite, keeping it damp but not soggy. Press the prepped seeds ½ inch deep into the mix, spacing them 1 inch apart.
Cover the container with clear plastic wrap to trap humidity, then place it in a location that maintains 75-85°F. A seedling heat mat set to 80°F works wonders if your home runs cooler. Check daily for condensation—if the plastic fogs up, remove it for 30 minutes to prevent mold.
☀️ Step 3: Monitor for Sprouts and Provide Gentle Light
Germination typically takes 2-4 weeks, but you'll spot success when tiny green shoots poke through the soil. Once sprouts appear, remove the plastic wrap immediately—too much humidity now causes damping-off. Place the container under bright, indirect light (a grow light on a 12-hour cycle works best).
Keep the growing medium consistently moist by misting lightly every 2-3 days. You'll know it's right when the surface feels damp but not wet. Avoid direct sunlight at this stage—young seedlings burn easily. Watch for first true leaves (not the initial seed leaves) to appear in 4-6 weeks.
🪴 Step 4: Transplant Seedlings to Individual Pots
When seedlings develop 2-3 sets of true leaves, it's time to move them. Gently remove each seedling, keeping as much of the root ball intact as possible. Plant them in 4-inch pots filled with a well-draining mix of 60% potting soil, 20% perlite, and 20% orchid bark.
Place each seedling 1 inch deep in the new pot, firming the soil gently around the base. Water thoroughly until it drains from the bottom, then place the pots in bright, filtered light for 1 week to help them adjust. Gradually introduce more direct light over 7-10 days as they strengthen.
⏰ Step 5: Maintain Ideal Conditions for Long-Term Growth
Taro flowers thrive with 60-70% humidity and 70-80°F temperatures. If your home is dry, group pots together or use a humidity tray filled with pebbles and water. Fertilize lightly every 4 weeks with a diluted balanced liquid fertilizer (half-strength) to avoid burning tender roots.
Rotate pots quarter-turn weekly so plants grow evenly. You'll notice stronger stems and darker leaves within 2-3 weeks of consistent care. Be patient—taro flowers take 12-18 months to bloom, but the journey is worth it for those stunning tropical blooms.
Tips & tricks for germinating taro flower seeds
Here's what I've learned after years of coaxing these stubborn tropical seeds into life—these little tricks make all the difference.
The Soaking Secret: Don't just soak your taro seeds for the full 24 hours—check them at the 12-18 hour mark. If you see tiny cracks forming, you can remove them early and give them a gentle rub. This prevents over-soaking, which can make the seeds mushy and difficult to handle. I've found that seeds ready at 16 hours often sprout faster than those soaked the full 24 hours.
Heat Mat Hack: If you don't have a seedling heat mat, try placing your germination container on top of your refrigerator. Most fridges maintain around 80°F, which is perfect for taro seeds. Just make sure the container stays elevated so condensation doesn't pool at the bottom. I've had great success with this method when my home runs cooler than the ideal 75-85°F range.
Light Transition Strategy: When you're ready to move your seedlings to brighter light after the first true leaves appear, do it gradually. Start with just 2 hours of direct light per day and increase by 30 minutes daily. This prevents shock and sunburn on those delicate young leaves. I've seen seedlings that got too much light too soon develop brown patches that took weeks to recover from.
Transplant Timing: Wait until you see the third set of true leaves before transplanting—this gives your seedlings enough strength to handle the move. I've found that seedlings with just two sets often struggle to establish themselves in their new pots. When you do transplant, water thoroughly before and after to help reduce transplant shock.
Pro Tips for Taro Flower Seed
- Here's what I've learned after years of coaxing these stubborn tropical seeds into life—these little tricks make all the difference.
- The Soaking Secret: Don't just soak your taro seeds for the full 24 hours—check them at the 12-18 hour mark.
- Heat Mat Hack: If you don't have a seedling heat mat, try placing your germination container on top of your refrigerator.
Frequently asked questions
Got questions about growing taro flower seeds?
You’re not alone! Here are some of the most common queries—and their straightforward answers—to help you cultivate tropical beauty with confidence.
How long does it take for taro flower seeds to germinate?
Patience is key! Taro flower seeds typically take 14–30 days to sprout, depending on warmth, moisture, and soil conditions. Keep the soil consistently moist (not soggy) and maintain temperatures above 70°F (21°C) for the best results. If germination takes longer, check for fresh seeds or adjust humidity.
Can I grow taro flowers from store-bought taro root?
Not directly—but you can propagate them! Taro roots (Colocasia) rarely produce flowers unless grown from seed. For taro flowers (Alocasia or Xanthosoma varieties), stick to seeds or divide mature plants. If you’re set on taro root, focus on growing the edible corms instead!
What’s the best temperature for growing taro flower seeds?
Taro flowers thrive in warmth! Ideal germination temps are 75–85°F (24–29°C). Use a heat mat if your climate dips below 65°F (18°C). Once sprouted, keep them in bright, indirect light (direct sun can scorch young seedlings). If temps drop, move pots indoors or extend the growing season with row covers.
Why aren’t my taro flower seeds sprouting?
Common culprits include:
- Old seeds: Taro seeds lose viability after 6–12 months. Test freshness by soaking in warm water—if they float, they’re likely dead.
- Poor drainage: Overwatering suffocates seeds. Use a mix of peat moss + perlite to prevent rot.
- Low humidity: Try a humidity dome or mist seeds daily until sprouts appear.
- Incorrect depth: Plant seeds ¼ inch deep—too deep delays germination.
Still stuck? Try a seed scarification trick: lightly sand the seed coat to help water penetrate.
Are taro flowers easy to grow for beginners?
Moderately! While they’re low-maintenance once established, seeds can be finicky to start. Beginners should:
- Start indoors in biodegradable pots for easier transplanting.
- Use a seedling heat mat to speed up germination.
- Gradually acclimate seedlings to outdoor conditions (called hardening off) to avoid shock.
If seeds prove tricky, consider buying young plants from nurseries—just ensure they’re labeled for your climate zone!
Wrapping up and next steps
Growing taro flower seeds is a rewarding journey that brings vibrant tropical beauty to your garden—whether you're a seasoned gardener or just starting out! 🌺 With the right soil, patience, and care, you’ll soon enjoy lush foliage and stunning blooms.
Remember, consistency is key, and don’t hesitate to troubleshoot common issues like mold or slow germination.
Ready to dive in? Start by gathering your supplies, then follow the step-by-step guide above. Your dream taro flower garden awaits—happy planting! 🌱