
Flowers
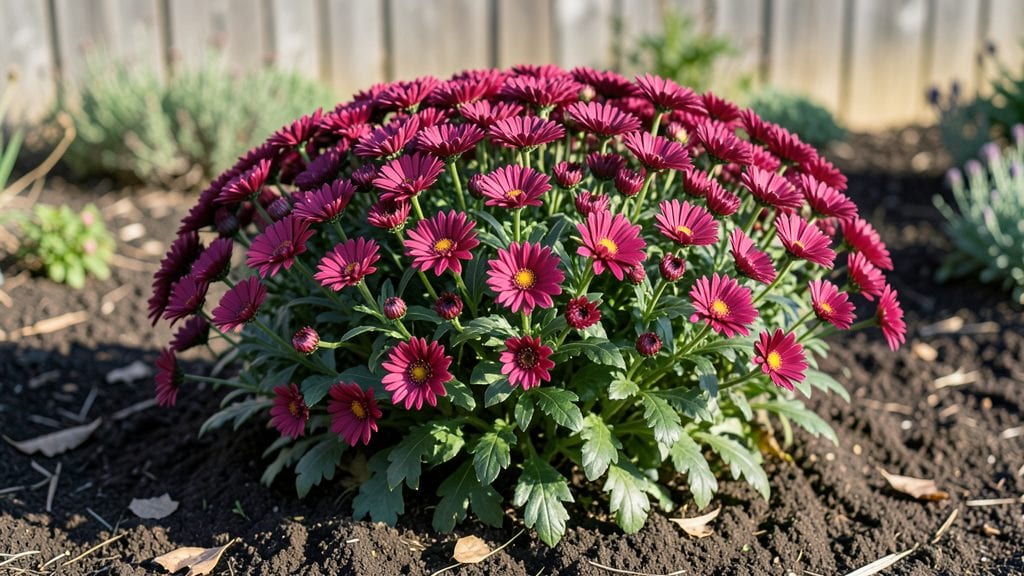
Growing Japanese flower chrysanthemums (Chrysanthemum × morifolium) feels like nurturing tiny bursts of autumn magic—except these stay vibrant well past the season. 🌿 I’ve learned their secret isn’t just patience, but precision: the right soil mix, strategic pruning, and understanding their love for cool weather.
These aren’t your grandma’s fall decorations; they’re year-round performers when cared for properly.
The key starts with well-draining soil—think 60% garden soil, 30% compost, and 10% perlite to keep roots happy. They crave full sun (6-8 hours daily) but tolerate light shade in hot climates. Watering’s the trickiest part: too much causes rot, too little stunts blooms.
I’ve found deep watering twice a week works best, adjusting for rain. And here’s the game-changer—late summer pruning encourages bushier growth and longer bloom seasons.
What you’ll end up with is a plant that rewards your attention with bold, jewel-toned blooms from late summer through winter. Mine’s become the showstopper in my garden, drawing hummingbirds and neighbors alike. The best part?
With proper care, they rebloom reliably year after year—no deadheading required. The cultural significance runs deep too; in Japan, they symbolize longevity and joy, making them more than just pretty faces.
Whether you’re a first-timer or a seasoned grower, these chrysanthemums adapt well to containers or garden beds. Just watch for aphids (spray with soapy water) and avoid over-fertilizing—it leads to leafy monsters, not flowers. Let’s get those blooms going strong!
📚 In This Guide
- What you need
- Instructions
- Tips and common mistakes
- Wrapping up and next steps
What you need
- ● Chrysanthemum plants: Choose hardy varieties like 'Kikusui' or 'Bonanza' (2–5 plants per container or 1 per 18-inch square in the ground).
- ● Well-draining soil: Mix 60% potting soil with 40% perlite or sand (1–2 bags, depending on container size).
- ○ Containers (optional but helpful): 5–10 gallon pots with drainage holes (1–2 per plant).
- ● OR raised beds (minimum 12" depth).
- ● Fertilizer: Slow-release granular fertilizer (10-10-10 or organic options like fish emulsion, 1 tbsp per plant).
- ● Watering can or hose with gentle spray nozzle.
- ● Pruning shears (sharp, sterilized).
- ○ Mulch (optional): Pine bark or straw (1–2 inches to retain moisture).
- ● Sunlight: Full sun (6+ hours daily) for vibrant blooms.
- ● Temperature: Chrysanthemums thrive in 50–75°F (10–24°C); protect from frost (<32°F/0°C).
- ● pH Level: Slightly acidic to neutral soil (pH 6.0–7.0). Test kits available at garden centers.
- ● Patience: These beauties take 8–12 weeks to bloom from cuttings!
- ● 🌿 Soil test: Check local extension offices for free/low-cost testing to tweak nutrients.
- ● 🛡️ Pest control: Keep aphids at bay with neem oil (spray lightly before planting).
- ● 🎨 Color inspiration: Gather photos of your dream chrysanthemum hues (pink, yellow, or deep burgundy?) for variety selection!
Step-by-Step instructions for cultivating Japanese flowering chrysanthemums
Here's how to coax vibrant, long-lasting blooms from these hardy perennials—season after season.
🌱 Step 1: Select and Prepare the Right Site
Japanese flowering chrysanthemums thrive in full sun to partial shade, with at least 6 hours of direct sunlight daily. I always choose a location with morning sun and afternoon shade in hot climates—this prevents leaf scorch while maintaining strong bloom production. The soil must drain well; these plants despise soggy roots, which leads to root rot and stunted growth.
Before planting, amend the soil with 2-3 inches of compost to improve fertility and structure. Work it into the top 12 inches of soil—this ensures roots have access to nutrients without competing with weeds. A soil test reveals pH needs; chrysanthemums prefer 6.0-6.5, so adjust with lime or sulfur if necessary. I like to add a slow-release 10-10-10 fertilizer at planting time for an immediate nutrient boost.
🪴 Step 2: Plant with Proper Spacing and Depth
For 4 plants, dig holes twice as wide as the root ball but no deeper than the container’s depth. Space plants 18-24 inches apart—this allows airflow to prevent fungal diseases like powdery mildew. Handle the root ball gently; any damage delays establishment. Place each plant so the top of the root ball sits just below soil level—burying too deep suffocates stems, while planting too high leaves roots exposed.
Backfill with native soil mixed with a handful of compost, then water deeply to settle everything. The soil should look uniformly moist but not muddy. I always add a 1-inch layer of mulch around the base, keeping it 2 inches away from stems to prevent rot. Use shredded bark or straw—both insulate roots in winter and suppress weeds without smothering plants.
☀️ Step 3: Maintain Light and Water Consistently
Chrysanthemums need bright light year-round for continuous blooming. In containers, rotate pots quarter-turn weekly so all sides receive even exposure. If growing indoors, supplement with a grow light providing 12-14 hours of light daily—standard household bulbs won’t cut it. Watch for pale, elongated stems; this signals insufficient light, and the plant will never produce tight, showy blooms.
Water when the top 2 inches of soil feel dry—stick your finger in to check. These plants tolerate brief dry spells but wilt dramatically if underwatered. In summer, water deeply every 2-3 days; in winter, reduce to once weekly. Always water at the base to avoid wetting foliage, which attracts fungal spores. I use a soaker hose for even moisture distribution without disturbing blooms.
✂️ Step 4: Prune for Bushier Growth and Prolonged Blooms
Pinch back new growth tips when plants reach 6 inches tall—this encourages branching and more flowers. Use clean pruners to snip just above a leaf node at a 45-degree angle. Repeat every 4-6 weeks through summer; chrysanthemums respond beautifully to this technique. Deadhead spent blooms weekly to redirect energy into new flowers instead of seed production.
In late summer, cut back one-third of the plant’s height to stimulate a second flush of blooms. This works best with hardy varieties like ‘Kirin’ or ‘Yuki-Onna’. After the first frost, cut back almost to the ground—this prevents flopping and prepares plants for dormancy. I always sterilize pruners with rubbing alcohol between cuts to prevent disease spread.
⏰ Step 5: Overwinter and Encourage Spring Renewal
Mound 4-6 inches of mulch around the base before the first frost to insulate roots. In colder zones, cover plants with burlap or frost cloth once temperatures drop below 25°F. Chrysanthemums are hardy to USDA Zone 5, but young plants benefit from extra protection. Remove covers in early spring once soil thaws—waiting too long smothers emerging shoots.
In late winter, apply a balanced fertilizer (like 10-10-10) to jumpstart growth. You’ll see new shoots emerge in 2-3 weeks—this is your cue to thin crowded stems. Prune back any dead or weak growth to redirect energy. By mid-spring, plants should look bushy and vigorous, ready for another season of vibrant blooms.
Tips & tricks for perfect Japanese flowering chrysanthemums
These precision-based tips will help you avoid common pitfalls and achieve show-stopping blooms that last all season.
Soil Preparation Strategy: When amending soil with 2-3 inches of compost in Step 1, I recommend mixing in 1 cup of perlite per cubic yard of soil. This improves drainage without compromising moisture retention—critical since soggy roots lead to root rot. Test your soil's drainage by filling a jar with soil and water; if water drains in under 30 minutes, your soil is well-prepared. The 12-inch deep incorporation ensures roots access nutrients without competing weeds.
Light Management Secret: In Step 3, the 12-14 hours of light requirement is non-negotiable for continuous blooming. For indoor growers, I recommend a full-spectrum LED grow light positioned 12-18 inches above plants. Rotate containers quarter-turn weekly to prevent lopsided growth—a common mistake that leads to sparse blooms. Watch for pale stems as your early warning sign of insufficient light.
Pruning Precision: The 6-inch height guideline in Step 4 is your cue for first pinching. Use clean, sharp pruners and make cuts at a 45-degree angle just above leaf nodes—this encourages lateral branching. I sterilize my pruners between cuts with rubbing alcohol to prevent disease spread, which is especially important during humid summer months. The weekly deadheading keeps plants focused on producing new blooms rather than seeds.
Winter Protection: When temperatures drop below 25°F in Step 5, I recommend using burlap wraps instead of plastic for overwintering. Burlap breathes while insulating, preventing moisture buildup that leads to fungal issues. The 4-6 inch mulch layer should be added after the first frost when soil temperatures consistently stay below 40°F—this prevents premature thawing that stresses dormant roots.
Pro Tips for Japanese Flower Chrysanthemum
- These precision-based tips will help you avoid common pitfalls and achieve show-stopping blooms that last all season.
- Soil Preparation Strategy: When amending soil with 2-3 inches of compost in Step 1, I recommend mixing in 1 cup of perlite per cubic yard of soil.
- Light Management Secret: In Step 3, the 12-14 hours of light requirement is non-negotiable for continuous blooming.
Frequently asked questions
When is the best time to plant a chrysanthemum in my region?
For hardy varieties, plant in early spring (March–April) or early fall (September–October)—this gives roots time to establish before extreme heat or cold. In warmer climates (Zones 8–11), opt for fall planting to avoid summer stress. Pro tip: Avoid planting when temps exceed 85°F (29°C) or drop below 40°F (4°C).
Why aren’t my chrysanthemums blooming this year?
Chrysanthemums need 12–14 hours of daylight to trigger blooms—if your plants aren’t flowering, they may be getting too much light (long summer days can delay blooms). Other culprits: over-fertilizing with nitrogen (prioritize phosphorus for flowers), crowded roots, or lack of deadheading. Try moving plants to partial shade and pinch back leggy stems in early summer.
How do I protect chrysanthemums from frost or winter damage?
Most varieties are frost-tolerant, but young plants or tender types need protection. Mulch heavily (3–4 inches of straw or leaves) before the first frost, and wrap containers in bubble wrap. In Zone 5 or colder, mound soil over crowns or use a cloche. Wait to prune until spring—never cut back into old wood, as new growth emerges from last year’s stems.
Can I grow chrysanthemums in containers? What’s the best setup?
Use large pots (12+ inches wide) with drainage holes and a well-draining mix (60% potting soil, 30% perlite, 10% compost). Choose compact varieties like ‘Bonanza’ or ‘Little Albert.’ Water containers daily in summer (they dry out faster) and fertilize every 2–3 weeks with a bloom booster. Move pots to bright, indirect light in winter.
What pests or diseases should I watch for, and how do I treat them?
| Pest/Disease | Signs | Solution |
|---|---|---|
| Spider mites | Fine webbing, yellow stippling on leaves | Spray with neem oil or rinse plants with water (repeat weekly) |
| Aphids | Sticky residue, curled leaves | Blast off with water or use insecticidal soap |
| Powdery mildew | White fungal coating on leaves | Improve airflow, spray with baking soda mix (1 tsp baking soda + 1 quart water + drop of soap) |
Preventative tip:
Avoid overhead watering and sterilize pruners with rubbing alcohol to stop spread.
Wrapping up and next steps
The Japanese chrysanthemum isn’t just a flower—it’s a symbol of resilience, beauty, and seasonal harmony. With the right care, you can enjoy its vibrant blooms year-round, whether as a stunning centerpiece or a thriving garden staple.
Remember, patience and precision in watering, pruning, and soil health are key to unlocking its full potential.
Now that you’re armed with expert tips, why not take the next step? 🌸 Start with a single plant, experiment with varieties, or even share your progress with fellow gardening enthusiasts. Your green thumb is ready—let your chrysanthemum thrive!