
Tools
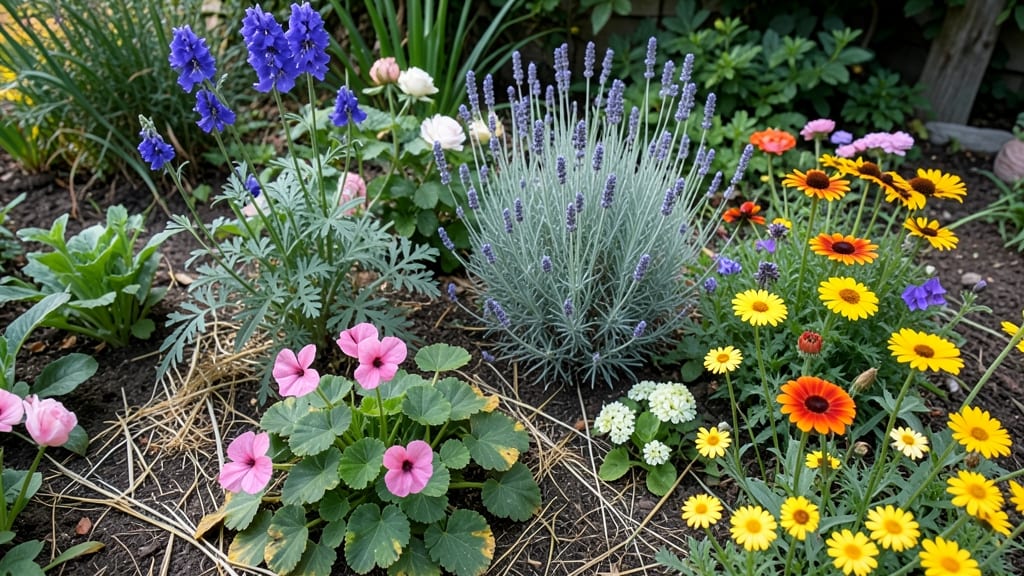
My cottage garden flower bed starts with a riot of colors and textures that spill over like a painter’s brushwork. 🌸 The magic lies in layering plants of different heights—tall delphiniums and hollyhocks as backdrops, roses and lavender in the middle, and low-growing thyme or violas at the front—creating depth that draws the eye (and pollinators) in.
This isn’t about rigid rows; it’s about letting stems wander, petals mingle, and the garden breathe with natural movement.
You don’t need a sprawling backyard to pull this off—even a small patch can become a pollinator paradise. I’ve seen cottage gardens thrive in window boxes, along fences, or in raised beds, using a mix of perennials for structure and annuals for seasonal bursts of color.
The key is balancing sun-loving plants like coneflowers with shade-tolerant ones like asters, so every corner feels intentional. And yes, roses belong here—their velvety blooms add that classic cottage charm.
What you’ll end up with is a garden that buzzes with bees, flutters with butterflies, and smells like a summer meadow. The colors shift from early spring’s hellebores to midsummer’s dahlias, then fade into autumn’s goldenrod and asters, keeping the show going until frost.
It’s not about perfection—it’s about creating a space that feels alive, inviting, and full of stories waiting to unfold.
Whether you’re working with a tiny urban plot or a half-acre, the principles stay the same: mix heights, blend textures, and let the plants do the talking.
The best part? Every season brings something new, and the more you grow, the more the garden grows with you. Let’s get those layers going!
📚 In This Guide
- What you need
- Instructions
- Tips and common mistakes
- Wrapping up and next steps
What you need
- ● Soil: 5–10 cubic yards of well-draining, nutrient-rich garden soil or a mix of topsoil and compost (50/50 ratio). Consider adding perlite or sand for sandy soil.
- ● Plants: A mix of perennials, annuals, and shrubs (10–20 plants total, depending on bed size). Popular choices: Perennials: Coneflowers, black-eyed Susans, lavender, or daylilies (3–5 plants each).
- ● Annuals: Marigolds, cosmos, or sweet alyssum (5–10 plants for color bursts).
- ● Shrubs: Butterfly bush, hydrangeas, or dwarf lilacs (1–2 for structure).
- ● Mulch: 2–3 bags of organic mulch (e.g., shredded bark or straw) to retain moisture and suppress weeds.
- ● Fertilizer: Slow-release organic fertilizer (e.g., 10-10-10 or compost-based) or a handful of worm castings for a natural boost.
- ○ Watering System: A soaker hose or drip irrigation kit (optional but highly recommended for efficiency).
- ● Essential Tools: Garden trowel (for planting small bulbs/seeds).
- ● Pruning shears (sharp and clean!).
- ● Garden fork or spade (for turning soil).
- ● Wheelbarrow (to haul soil/mulch).
- ● Measuring tape or string (to mark bed layout).
- ○ Optional (But Helpful!): Knee pads (for comfort during long planting sessions).
- ● Garden gloves (to protect hands from thorns or dirt).
- ● Spray bottle (for misting seedlings).
- ● Stakes or trellises (for climbing plants like clematis or sweet peas).
- ● Sunlight assessment: Ensure your bed gets at least 6 hours of sunlight daily (most cottage plants thrive in full sun).
- ● Water access: A nearby hose spigot or irrigation setup within 50 feet.
- ● Local climate knowledge: Check your USDA hardiness zone to pick cold-hardy plants if needed.
- ● Pollinator-friendly mindset: Avoid pesticides—let bees, butterflies, and hummingbirds enjoy the feast!
Step-by-step instructions for creating a pollinator-friendly cottage garden
Here's how to craft a layered flower bed that buzzes with life from spring through fall.
🌱 Step 1: Choose and Prepare Your Planting Site
Select a location with at least 6 hours of sunlight daily. Cottage gardens thrive in well-draining soil, so avoid low spots where water pools. I like to mark a 4-foot square area with wooden stakes and string—this gives enough room for your whimsical layers without feeling crowded.
Loosen the top 6-8 inches of soil with a garden fork, breaking up any compacted layers. Mix in a 2-inch layer of compost to enrich the soil naturally. This step ensures roots can spread easily and access nutrients all season long.
🪴 Step 2: Build the Foundation with Perennials and Shrubs
Start with 3-5 perennial plants as your anchor layer—they'll return year after year. I recommend planting them 12-18 inches apart to allow room for growth and airflow. Choose a mix of heights: taller varieties like coneflowers or black-eyed Susans in the back, medium-heights like daylilies in the middle, and shorter plants like lavender or catmint in front.
Dig holes just deep enough to accommodate the root balls, then water each plant thoroughly before placing it in the soil. Gently firm the soil around the roots to eliminate air pockets. This foundation ensures your garden has structure and stays lush even during dry spells.
🌿 Step 3: Add Mid-Season Bloomers for Continuous Color
Fill gaps with annuals and biennials that bloom in mid-to-late summer, like cosmos, zinnias, or snapdragons. These plants fill in the spaces between perennials and keep your garden vibrant when some varieties start to fade. Space them 6-12 inches apart, depending on their mature size.
Here's the thing—I like to mix heights and textures here. Taller annuals like sunflowers or hollyhocks can add drama, while shorter, bushier plants like marigolds or sweet alyssum create a soft, inviting foreground. Water gently after planting to help the roots settle into their new home.
☀️ Step 4: Top With Low-Growing Pollinator Favorites
Finish your cottage garden with ground covers and trailing plants like creeping thyme, ajuga, or creeping phlox. These plants spread naturally and fill in any remaining gaps, creating a lush, cohesive look. Plant them 8-12 inches apart to encourage their spread without overcrowding.
This top layer is where pollinators love to linger. The tiny flowers provide easy access to nectar, and the dense foliage offers shelter. Water lightly after planting, and you'll see these plants establish quickly, creating a vibrant carpet of color and texture.
✂️ Step 5: Maintain and Enjoy Your Living Cottage Garden
Once your garden is planted, water deeply 2-3 times per week until plants are established, then taper to once a week once they're growing well. Mulch with 2-3 inches of organic mulch to retain moisture and suppress weeds. I like to use shredded bark or straw—it looks natural and breaks down over time.
Deadhead spent blooms regularly to encourage more flowers and keep your garden looking tidy. This simple step extends the blooming season and ensures your pollinator friends always have fresh nectar. Sit back and enjoy the show—your cottage garden will attract bees, butterflies, and hummingbirds all season long!
Tips & tricks for perfect pollinator-friendly cottage gardens
Creating a thriving cottage garden takes more than just planting flowers—it's about smart layering and care that keeps pollinators buzzing all season. Here are my go-to strategies for a garden that truly comes alive.
Sunlight Strategy: That 6 hours of sunlight daily is non-negotiable for pollinator plants like coneflowers and lavender. I always check sunlight patterns throughout the day—morning sun is gentler, while afternoon sun can be intense. If your spot gets partial shade, opt for shade-tolerant pollinators like ajuga or creeping phlox for the top layer instead.
Soil Preparation Secret: Don't just loosen the top 6-8 inches of soil—think about the long-term health of your garden. I like to add a handful of bone meal or composted manure to the 2-inch compost layer for extra phosphorus, which helps roots establish quickly. This gives your perennials a strong start that pays off for years to come.
Plant Spacing Wisdom: Those spacing measurements (12-18 inches for perennials, 6-12 inches for annuals) might seem strict, but they're crucial. Crowded plants compete for nutrients and airflow, making them more susceptible to disease. I use a simple tape measure to mark planting spots—it takes 10 minutes but saves headaches later when plants outgrow their space.
Pollinator Layering: The top layer with creeping thyme and ajuga isn't just decorative—it's where the real pollinator action happens. These ground covers create a "landing platform" for bees and butterflies. I always plant them last because their delicate roots can get damaged by foot traffic when other plants are already in place.
Pro Tips for Cottage Garden Flower Bed
- Creating a thriving cottage garden takes more than just planting flowers—it's about smart layering and care that keeps pollinators buzzing all season.
- Sunlight Strategy: That 6 hours of sunlight daily is non-negotiable for pollinator plants like coneflowers and lavender.
- Soil Preparation Secret: Don't just loosen the top 6-8 inches of soil—think about the long-term health of your garden.
Frequently asked questions
Got questions about creating your dream cottage garden flower bed?
Here are answers to the most common ones to help you plan with confidence!
What’s the best time of year to plant a cottage garden flower bed?
For most climates, spring (after the last frost) and early fall are ideal. Spring gives flowers time to establish before summer heat, while fall plants thrive with cooler temps and winter moisture. Perennials (like lavender or peonies) can even be planted in late fall in mild zones!
How do I attract more pollinators to my cottage garden?
Plant a mix of native wildflowers (e.g., coneflowers, milkweed), herbs like thyme or oregano, and shallow water sources (a birdbath with rocks works!). Avoid pesticides, and include early, mid-, and late-season bloomers to feed pollinators year-round.
Are there budget-friendly alternatives to expensive cottage garden plants?
Start with seeds (like cosmos or marigolds) instead of transplants, or divide existing perennials (e.g., daylilies or hostas). Visit local plant swaps, thrift stores for vintage pots, or propagate cuttings from friends’ gardens. Even "weeds" like clover or dandelions add charm!
How do I keep my cottage garden looking lush in heavy rain or drought?
Improve soil with compost or mulch (2–3 inches) to retain moisture. Group plants with similar water needs (e.g., drought-tolerant lavender with rosemary). For rain, ensure good drainage—elevate beds if needed—and use raised containers for soggy areas. Drip irrigation or soaker hoses help too!
What’s the easiest way to deal with pests without chemicals?
Encourage beneficial insects like ladybugs or lacewings by planting dill, fennel, or alyssum. Handpick larger pests (e.g., slugs at night with a flashlight!) or use beer traps for slugs. Neem oil or insecticidal soap are gentle sprays for stubborn issues.
Can I mix vegetables or herbs into my cottage garden flower bed?
Yes! Many edibles thrive in cottage gardens—try nasturtiums (edible flowers), borage (bee-friendly), or chives alongside roses. Just avoid heavy feeders (like tomatoes) near delicate flowers. Stick to companion planting (e.g., marigolds deter pests from veggies).
Wrapping up and next steps
A cottage garden flower bed isn’t just a pretty sight—it’s a thriving ecosystem that brings joy, color, and life to your outdoor space. By layering plants thoughtfully and welcoming pollinators, you create a haven that blooms season after season with minimal fuss. 🌸
Ready to dive in? Start small—pick a sunny spot, gather your favorites from the list above, and let nature do the rest. Before you know it, your garden will buzz with bees, flutter with butterflies, and charm every visitor (including you!). Happy planting! 🌿