
Blooming
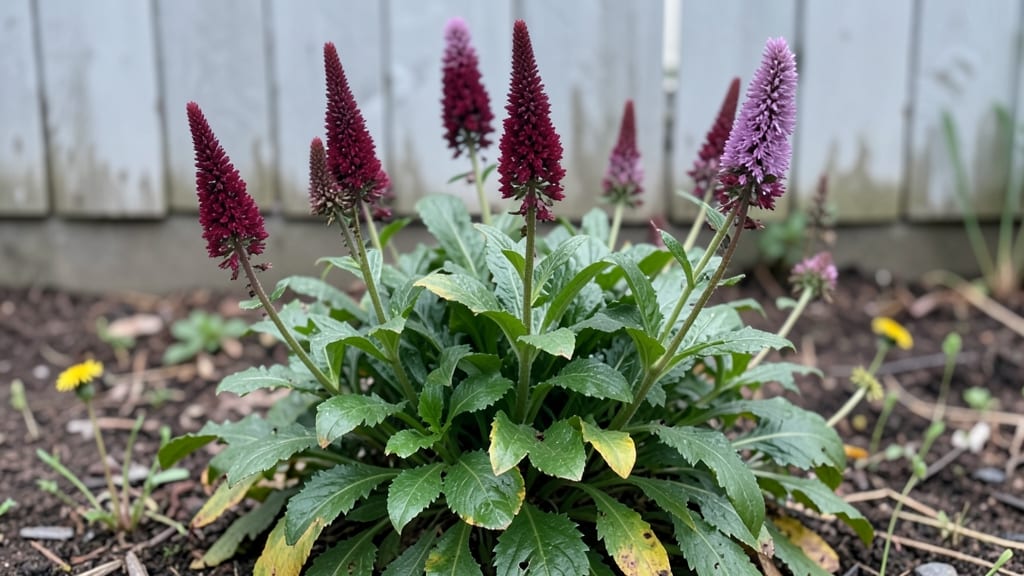
The astilbe flower season arrives when feathery plumes burst into bloom as summer hums into full swing—my favorite moment in the garden. 🌿 These cool-climate stars shine from late spring through midsummer, their delicate spikes adding texture to shady borders and containers where other flowers fade.
The timing varies slightly by region: Northern gardeners see their peak in June, while Southern growers might enjoy them into early July.
Here's the secret to their showstopping display: plant them in early spring or fall when soil temperatures are cool, and prune back old foliage in late winter before new growth starts.
They thrive in partial shade and moist, well-draining soil—think woodland edges or dappled sunlight spots. Varieties like 'Fanal' and 'Deutschland' bloom earlier, while 'Glut' and 'Amethyst' stretch their season into August.
What makes astilbes special is how they perform when others struggle. While hydrangeas wilt in heat, astilbes stay lush and colorful, their feathery blooms swaying in gentle breezes. The key is consistent moisture—dry spells cause them to wilt faster than you'd expect.
With proper care, you'll get 6-8 weeks of vibrant color that transforms any garden corner.
They're particularly reliable in zones 4-9, though some varieties handle heat better than others. For extended blooms, deadhead spent flowers after they fade—this encourages a second flush in some varieties. The trade-off? Their foliage turns unsightly by fall, but that's when I start planning next year's plume-filled display.
📚 In This Guide
- What you need
- Instructions
- Tips and common mistakes
- Wrapping up and next steps
What you need
- ● Astilbe plants: Choose 1-3 plants per spot (depending on desired fullness). Opt for nursery-bought starts (easier for beginners) or seeds (for advanced gardeners). Popular varieties include Astilbe chinensis (tall, feathery plumes) or Astilbe simplex (compact, early blooms).
- ● Well-draining soil: Amend garden soil with 2-3 inches of organic matter like compost or peat moss (astilbes hate soggy roots!).
- ● Mulch: 2-3 inches of shredded bark or pine needles to retain moisture and suppress weeds.
- ● Fertilizer: A balanced, slow-release granular fertilizer (10-10-10 ratio) or organic options like worm castings or fish emulsion (apply at planting and mid-season).
- ● Garden trowel or shovel (for digging holes 2x wider than the root ball).
- ● Pruners or shears (for trimming dead foliage after blooming or dividing clumps).
- ● Watering can or hose with a gentle spray nozzle (astilbes love consistent moisture!).
- ○ Gloves (optional but recommended—those leaves can be prickly!).
- ● Partial shade: Astilbes thrive in morning sun + afternoon shade (or full shade in hot climates).
- ● Moisture-retentive site: They cannot tolerate drought. Plan to water daily in dry spells.
- ● Cool-season timing: Plant in early spring or fall (avoid summer heat stress!).
- ● Patience: Seeds take 1-2 years to bloom; nursery starts reward you with color the same season!
- ● Epsom salt (1 tbsp per plant monthly) for pink/red blooms.
- ● Stakes or pebbles to weigh down tall varieties (prevents flopping).
- ● Drip irrigation system for hassle-free watering.
- ● Companion plants: Pair with hostas, ferns, or heucheras for a lush, shade-loving display.
Step-by-Step guide to planting and caring for astilbe flowers
Here's how to grow these feathery beauties that bring soft texture and vibrant color to shady spots.
🌱 Step 1: Choose the Right Planting Location
Astilbes thrive in partial to full shade, making them perfect for woodland gardens or under trees. I always pick spots that get morning sun and afternoon shade—this prevents the foliage from scorching while still giving enough light for vibrant blooms. The soil should stay consistently moist, so avoid dry, exposed areas.
Dig a hole twice as wide as the root ball but only as deep. This encourages roots to spread horizontally rather than settling too deep, which can lead to weak stems. Gently loosen the roots if they're circling tightly in the pot—just tease them apart with your fingers.
💧 Step 2: Prepare Soil and Plant with Care
Mix the 2-3 inches of compost into the native soil at the bottom of the hole. Astilbes love rich, moist but well-draining soil—amending with compost ensures they get the nutrients they need without sitting in soggy conditions. Avoid heavy clay by adding a handful of perlite if your soil feels compacted.
Place the plant in the hole so the top of the root ball sits even with the ground level. Press the amended soil around the roots firmly but gently—you want good contact without crushing the roots. Water deeply right after planting to settle the soil and eliminate air pockets.
☀️ Step 3: Water and Mulch for Consistent Moisture
Water your astilbe once a week during the first growing season, aiming for 1 inch of water per week. You'll know it's enough when the top 2 inches of soil feel damp but not waterlogged. Overwatering can cause root rot, so always check before adding more.
Spread the 3 inches of mulch evenly around the base, keeping it 2 inches away from the stems. This helps retain moisture, suppresses weeds, and keeps roots cool. I use shredded bark mulch because it breaks down slowly and improves soil structure over time.
✂️ Step 4: Prune and Maintain Through the Season
Cut back the brown foliage in late fall or early spring before new growth appears. This keeps the plant tidy and prevents disease from overwintering in dead stems. I like to trim back about 6 inches from the ground—this encourages bushier growth and more vibrant blooms later.
Fertilize once in early spring with the balanced fertilizer (10-10-10). Sprinkle it around the base and water deeply to help it dissolve into the soil. Avoid fertilizing in late summer—this can lead to soft, leggy growth that won't survive winter.
🌿 Step 5: Divide and Propagate Every 3-4 Years
Dig up the plant in early spring or fall when it's dormant. Gently separate the clumps into 3-4 inch sections, making sure each piece has 3-4 healthy shoots. Replant the divisions immediately in prepared soil, watering them deeply to help them establish.
This keeps your astilbe looking fresh and prevents overcrowding. I've found that dividing in early spring gives the plants the whole season to recover before winter, while fall divisions establish roots before the ground freezes.
Tips & tricks for perfect astilbe planting and care
Here's what I've learned after years of growing these stunning shade plants—tricks that make all the difference between average and showstopping astilbes.
Location Secret: In Step 1, when choosing your planting spot, look for areas where morning sun warms the soil but afternoon shade protects the delicate foliage. I've found that spots near evergreen trees work perfectly—their dappled shade mimics the plant's natural woodland habitat. If your yard gets intense afternoon sun, consider planting near a north-facing wall or under deciduous trees that leaf out later in spring.
Root Preparation: Don't skip loosening those circling roots in Step 1—this is where many gardeners go wrong. I use my fingers to gently tease apart any roots growing in tight circles around the root ball. This encourages outward growth rather than a tangled mess that can lead to weak stems. If the roots are particularly matted, soaking the root ball in water for 10 minutes before planting can help loosen them up.
Soil Mixing Strategy: For Step 2, when mixing your 2-3 inches of compost into native soil, I recommend using a ratio of 1 part compost to 3 parts soil. This gives you enough organic matter to improve drainage without overwhelming the plant. If your soil is particularly heavy clay, add an extra handful of perlite to the mix—this creates tiny air pockets that help roots breathe while still retaining moisture.
Watering Wisdom: The once-a-week watering in Step 3 is perfect, but here's how to make it even better: use a rain gauge or tuna can to measure your 1 inch of water. I've seen many gardeners guess and end up either underwatering (leaving plants thirsty) or overwatering (causing root rot). Water in the morning so the foliage has all day to dry, reducing the risk of fungal diseases. And always check that top 2 inches of soil—it should feel like a damp sponge, not a soggy washcloth.
Pro Tips for Astilbe Flower Season
- Here's what I've learned after years of growing these stunning shade plants—tricks that make all the difference between average and showstopping astilbes.
- Location Secret: In Step 1, when choosing your planting spot, look for areas where morning sun warms the soil but afternoon shade protects the delicate foliage.
- Root Preparation: Don't skip loosening those circling roots in Step 1—this is where many gardeners go wrong.
Frequently asked questions
Got questions about astilbe flower season? You’re not alone! Here are some of the most common queries—plus quick, practical answers to help you grow these feathery beauties with confidence.
When is the best time to plant astilbes for peak blooms?
Plant astilbes in early spring or fall (4–6 weeks before the first frost) for the best results. This gives roots time to establish before summer heat or winter cold. If you’re in a mild climate, spring planting is ideal—just water deeply after transplanting to reduce shock.
How long does astilbe flower season last, and how do I extend it?
Astilbe blooms typically last 4–6 weeks per season, peaking in late spring to early summer. To prolong their display:
- Deadhead spent blooms (trim back by ⅓) to encourage a second flush.
- Choose late-blooming varieties like ‘Fanal’ or ‘Deutschland’ for a longer show.
- Plant in partial shade to prevent early wilting from heat.
Why aren’t my astilbes blooming this season?
No blooms? Don’t panic! Common culprits include:
- Too much sun (they thrive in partial shade—6+ hours of dappled light max).
- Over-fertilizing (focus on balanced, low-nitrogen fertilizer in early spring).
- Crowded roots (divide clumps every 3–4 years in early spring).
- Drought stress (keep soil consistently moist, especially during bud formation).
Pro tip: If leaves look leggy or sparse, your plant may need more shade or a spring trim to encourage bushier growth.
Can I grow astilbes in containers, and what’s the best setup?
Astilbes love containers—just follow these rules:
- Use a well-draining mix with peat moss or compost for moisture retention.
- Choose smaller varieties like ‘Bridal Veil’ or ‘Deutschland’ (they stay compact).
- Plant in a 5–7 gallon pot with a saucer to catch excess water.
- Place in morning sun/afternoon shade (avoid harsh afternoon rays).
Bonus: Pair them with heucheras or hostas for a stunning shade garden in a pot!
Are astilbes deer-resistant, and what pests should I watch for?
Great news: Deer usually avoid astilbes (they prefer tastier snacks like roses or hostas). However, watch for:
- Japanese beetles (handpick or use neem oil).
- Aphids (spray with soapy water if clusters appear sticky).
- Slugs/snails (use beer traps or diatomaceous earth in damp areas).
Preventative tip: Mulch with gravel or pine needles to deter pests while keeping roots cool.
Wrapping up and next steps
Astilbe flowers bring a touch of whimsical charm to gardens, especially in cooler climates where their feathery plumes shine brightest during their peak season—typically late spring to early summer.
Whether you're a seasoned gardener or just starting, these low-maintenance beauties reward patience with vibrant blooms that attract pollinators and add texture to any landscape. Now that you’re equipped with planting tips and troubleshooting know-how, why not take the next step?
🌱 Grab some astilbe starts or seeds and experiment with colors and varieties—your garden will thank you! And if you’re feeling inspired, share your progress or ask questions in gardening communities. Happy planting! 🌿